Kernun UTM can be installed using either the standalone installer booted from the installation medium, or command line or GUI system management tools. The first installation on a new computer must be done using the standalone installer, which does not require an already installed Kernun UTM with initialized system and data disks and is able to initialize the standard disk layout, as described in Section 2, “Disk Space Layout”. Once there is at least one working Kernun UTM instance on the computer, further installations can by done from it using either the GUI, or the sysmgr command line tool. The standalone installer is able to install in any system partition. The GUI and command line installations cannot be performed in the system partition that contains the currently running Kernun UTM instance.
Note
Regardless of the installation method, the newly installed system partition is, by default, enabled in the boot manager and made the default selection for the next boot. The boot manager can be reconfigured using the GUI or the command line utility bootmgr(8).
The standalone installer is normally used only for the first installation on a new computer, after replacing a disk, or if disk repartitioning is needed. In other situations, installation using the GUI (Section 5.3, “Installation from the GUI”) or the command line (Section 5.4, “Installation from the Command Line”) is more comfortable.
Note
Since version 3.11.7-h3, the installer boots using only UEFI (with disabled Secure Boot), while previous versions used only legacy BIOS. If your hardware does not support UEFI, consider installing an older version and upgrading it to the latest version.
To start the standalone installer, you need the Kernun UTM installation medium[2]. Boot from the USB flash drive and following the boot loader and kernel messages, you will see the installer menu.
*** KERNUN INSTALLATION ***

Build 030000h00.200809241501.i386

1. Install Kernun
2. Check for existing Kernun installations
3. Restore backup
4. Start rescue shell
5. Mount Kernun file systems
6. Resize installer's in-memory temporary file system (current size 32m)
7. Halt
8. Power down
9. Reboot
0. Install license

Select action:
Press 1<Enter>. If the disk partitioning for
Kernun UTM has already been done, the device names of the system and data disks are
displayed and the installer asks whether you want repartitioning.
Detected Kernun system disk ad0
Detected Kernun data disk ad0
Repartition disks (y/n)?
Reply n to skip disk
partitioning. If you reply y or if the disk
partitioning has not been done yet, the system suggests the default
installation:
Default installation parameters:
System disk: ada0 (131072 MB)
SSD disk: ada1 (524288 MB)
Swap size: 8192 MB

Install with default parameters? (y/n)
Reply y<Enter> to finish the
installation with default parameters. If you reply n,
the installation parameters are asked. Select the system disk and partitioning
schema:
Detected disk devices: ada0 131072 MB ada1 524288 MB media RPM non-rotating Kernun system disk(ada0 ada1) [ada0]:<Enter>Use ZFS (y/n)y<Enter>
Always select a disk that the BIOS (or UEFI) will be able to boot from as the system disk[3]. If there is only one disk device, the selection of devices will be skipped and the single device will be used. The ZFS partitioning schema is prefered over the legacy (UFS) schema. Note that ZFS boots using UEFI while UFS boots using legacy BIOS.
Tip
When the installer asks a question, it offers a default value
in brackets. Press <Enter> to
select the default value.
The installer then asks for the swap size. Reasonable default value is provided. It can be changed if the default value does not meet the expectations.
System disk size is 131072 MB Memory size is 4096 MB Swap partition size in MB [8192]:<Enter>Disk ada0 [131072 MB] will contain 3 GPT partitions: ada0p1 with freebsd-boot ada0p2 with freebsd-swap [8192 MB] ada0p3 with freebsd-zfs Use these values (y/n)?y<Enter>Disk partitioning will delete contents of selected disks, continue (y/n)?y
If you want to cancel the installation process, answer
n to the last question. It will return to the
main menu without changing the disk contents.
Warning
Answering y to the ``continue'' question will
initialize the selected system and data disks with the standard disk
layout for Kernun UTM. Any existing contents of the disks will be lost.
If there is a SSD disk, it is offered to be used. Select
the device name to use the SSD disk, or select NO
not to use it.
Detected disk devices:
ada1 524288 MB
  media RPM           non-rotating
Create SSD disk (NO ada1) [NO]: ada1<Enter>
Creating KBI disk on ada1
Messages concerning creation of disk partitions and file systems will then be displayed, followed by:
Current Kernun installations: Boot manager on ZFS pool 'kernun' F1: Unused F2: Unused F3: Unused type=Kernun ZFS boot manager ver. 1.0 current_booted=NONE bootable= update=1 default_selection=NONE Select partition for installation (1 2 3) [1]:<Enter>Overwrite partition /dev/ad0s1 by new Kernun installation (y/n)?y
These lines show the configuration of the Kernun UTM boot manager, see
bootmgr(8). The first installation will be
usually performed in the first system partition, so just press
<Enter>. Finally, you are asked to
confirm whether you want to overwrite the selected system
partition.
The installer creates any missing
standard directories in the data partition, creates a new empty file
system in the selected system partition, and displays a list of the
installation images (identified by build numbers) available on the medium
and in the /data/dist directory. If there is more
than one image, one can be selected, with the
newest image as the default. If the image from the medium is selected, it
is first copied to /data/dist. The selected image
is then unpacked to the system partition. The
/etc/fstab file in the newly installed partition
is adjusted according to the system partition number. The build number
of the installed Kernun UTM is stored in the
/kernun-version file in the system partition. The
content of the newly installed Kernun UTM instance is stored in
/kernun-installed.fsdb.bz2. This file is used by
the backup tools in order to decide which files have changed since the
installation and therefore need to be backed up. After the installation
is finished, the installer waits for
<Enter> and then returns to the
main menu.
...
Available installation images:
     1  030000h00.200809241501.i386
Copying installation image to /data/dist
Clearing system partition 1
...
Installing kernun-030000h00.200809241501.i386.txz to system partition 1
Unpacking image
Removing file system content databases for installed images
Creating /etc/fstab
Writing build number into /kernun-version
Creating file system content database
Installation successfully finished

Press Enter for return to menu...
Optionally, if you have a license file for your newly installed
system available, you can install it now. This ensures that the initial
configuration script will set the system.product
configuration item correctly after reboot. It will also ask whether the
licensed proxies should be enabled in the initial configuration. The
license installation is done in several steps:
Prepare a USB disk with a UFS or FAT file system.
Copy the license file
license.datto the root directory of the USB disk. Alternatively, if you have some other license files (for example, for the antivirus engine), you can pack them all[4] in thelicense.tarfile in the tar format with all paths relative to the Kernun system root directory.Do not connect the USB disk yet and select
0from the installer main menu.When prompted, connect the USB disk. The license files present will be installed.
Select 9 from the main menu to have the
newly installed Kernun UTM booted. You can then perform its initial
configuration, as described in the following section.
Note
The /data/dist directory may contain full and
patch installation images. A full image can be always installed. A patch
image contains only the differences from a base image. Hence the base image
must be available in order to install the patch image. The base image may
itself be a patch image, and its base image is then required as well. Generally,
each patch image requires a continuous sequence of base images starting
with a full image followed by zero or more patch images.
When a newly installed Kernun UTM system is booted for the first time, an
interactive initial configuration script
(/etc/rc/kernun-config) is executed early in
the boot process[5].
It prompts the administrator for various basic system
parameters, creates and applies the Kernun UTM configuration file, and
finishes the boot procedure with the new configuration. The initial
configuration can be modified later using the standard Kernun GUI or
command line configuration tools.
First, the time zone needs to be set. We recommend to use UTC for
the CMOS clock—select Yes by pressing
<Tab><Enter> in
the first dialog.
Even if the CMOS clock is currently set to the local time, it is
better to select UTC here and adjust the time later using the
date(1) command or by configuring NTP,
see section ntp in
system(5). After selecting the CMOS clock
mode, the time zone menu is displayed. Choose the time zone suitable for
your location. Then set the administrator password
(user root).
After that, a new SSH host key is generated. It is used to authenticate the system to a remote access client[6] (GUI or command line SSH). You should write down the reported key fingerprint and compare it with the fingerprint reported by SSH or the GUI when making the first remote connection to the system. The SSH host keys should be the same for all Kernun UTM installations on the same computer. Therefore, if an SSH host key exists during the installation, it is copied to the newly installed system partition and the generation of a new key is skipped during the initial configuration. The GUI and command line installers look for an SSH host key in the current system partition. The standalone installer takes an SSH host key from the first system partition that contains one and is different from the partition, in which the installation is taking place.
Answer n to the following question (or
just press <Enter>) if you
want to input the basic configuration parameters and generate the
initial Kernun UTM configuration file.
**********************************************************************
Fingerprint of the SSH host DSA key. Compare this value with the value
reported by SSH client or Kernun GUI when connecting in order to check
that you are connecting to this system.

1024 71:0a:ec:8d:dd:9e:e7:2d:2b:91:79:0e:1a:ca:89:2b
        /etc/ssh/ssh_host_dsa_key.pub
**********************************************************************


*** KERNUN INITIAL SYSTEM CONFIGURATION ***

Skip Kernun configuration (y/n)? [n] <Enter>
Two network interfaces are configured in the default configuration: internal, intended to be connected to the protected network, and external, which is typically connected to the Internet. The configuration script asks for the names, IP addresses, and network masks of these interfaces. Then, the DNS server and default router addresses need to be specified. The initial configuration will allow the administrator SSH access from the internal network (using the GUI or a command line SSH client). If you want to allow some application protocols to pass from clients in the internal network to servers in the external network, you can enable the respective proxies. The configuration of the proxies will contain the default values of various parameters, which will be sufficient for the simplest use. More complicated configuration requirements can be implemented later by editing the generated initial configuration file using the GUI or command line configuration tools (modifying proxy configuration, adding new proxies, etc.). An example of the initial configuration setup is given and explained below.
Caution
In many environments, an initial configuration with enabled proxies may violate a security policy. Therefore, it is recommended not to enable any proxy in the initial configuration unless you are sure that you really need it.
Hostname without domain []:fwDomain []:
example.comShow only Ethernet interfaces (y/n)? [y]By repeating the following test with connected and disconnected network cables, you can determine interface names of physical network cards. *** Media state of network interfaces *** ed0: media: Ethernet autoselect (100baseTX <full-duplex>) ed1: media: Ethernet autoselect (100baseTX <full-duplex>) Show again (y/n)? [y] *** Media state of network interfaces *** ed0: media: Ethernet autoselect (none)
ed1: media: Ethernet autoselect (100baseTX <full-duplex>) Show again (y/n)? [y] *** Media state of network interfaces *** ed0: media: Ethernet autoselect (100baseTX <full-duplex>) ed1: media: Ethernet autoselect (100baseTX <full-duplex>) Show again (y/n)? [y]
nInternal interface name (ed0 ed1) []:ed0Internal IP address []:
192.168.10.1Internal interface netmask [24]: External interface name (ed0 ed1) []:ed1External IP address []:
192.168.11.2External interface netmask [24]: DNS server IP address []:10.1.1.1Default router IP address []:
192.168.1.1Postmaster e-mail [postmaster@example.com]:
Enable some proxies (y/n)?
yEnable DNS proxy (y/n)? [n]
yEnable FTP proxy (y/n)? [n] Enable HTTP proxy (y/n)? [n] Enable HTTPS proxy (y/n)? [n] Enable POP3 proxy (y/n)? [n] Enable IMAP4 proxy (y/n)? [n] Enable SMTP proxy (y/n)? [n] Enable SSH proxy (y/n)? [n]yHostname: fwDomain: example.com Internal interface: ed0 Internal IP: 192.168.10.1 Internal netmask: 24 External interface: ed1 External IP: 192.168.11.2 External netmask: 24 Name server: 10.1.1.1 Default router: 192.168.11.1 Postmaster e-mail: postmaster@example.com Enabled proxies: DNS SSH Use these values (y/n)?
y
The configuration begins with
setting the host name and the domain name. Then, the internal and external
interfaces are selected. First, the available network interfaces are listed.
You can choose whether you want to show all
interfaces, or just Ethernet interfaces. The interfaces are repeatedly
listed with their media states. This can be useful if you are not
sure about the names of physical interfaces. You can unplug network cables
one by one and observe, which interface changes its state. In the example
, the cable was unplugged from the network
interface ed0. The internal and external interface
names, IP addresses, and network masks are defined. The DNS server IP
address is used by Kernun UTM for domain name
resolution. The default router is typically
a router in the external network. The postmaster e-mail address is used by the SMTP proxy to forward mail sent
to the postmaster.
You can also enable some proxies for
access from the internal to the external network. Questions about
individual proxies are asked only if you reply y to
the initial “enable some proxies” query. Otherwise, all proxies
are disabled without further questions. The generated initial
configuration file will contain configuration of the disabled
proxies as well, with their configuration sections marked as hidden. A proxy
can be easily enabled later by unhiding its configuration using the
GUI or the command line configuration interface. Only licensed proxies are
offered for enabling.
Finally, all values defined during the configuration setup are listed
. If you are satisfied, reply
y and the initial
configuration file will be generated and applied. If you reply
n, the whole configuration setup will be repeated
with the previously specified values as defaults.
After defining values for the initial configuration, the SSH key for remote administrator access is generated. You must enter a passphrase used to encrypt the key. The same passphrase is also used for the initial download of the key from Kernun UTM.
The configuration script will now generate the root's SSH key.
The passphrase for the key will be also used as the password
for initial key download from Kernun GUI.
Enter SSH key passphrase:
Repeat SSH key passphrase:
Generating public/private dsa key pair.
Your identification has been saved in /home/keygen/id_dsa.
Your public key has been saved in /home/keygen/id_dsa.pub.
The key fingerprint is:
33:27:5a:63:53:b1:ba:47:bf:e8:58:4a:d0:f6:d4:d4 root@fw.example.com
The SSH key generation is the last step in the initial configuration process. After that, the normal operation of the newly installed Kernun UTM begins.
The SSH (private) key needs to be downloaded to the administrator's
local computer and subsequently copied to any system used by the
administrator to access Kernun UTM. The administrator's computer must be
in a network routed via the Kernun UTM internal interface, e.g.,
192.168.10.0/24 in our
configuration example. There is a special user account keygen dedicated to SSH key download. The
GUI is able to download the key automatically, you only need to select
Initialize new firewall in the Connect to
Server dialog. See also Section 1.1, “Kernun GUI Launcher” for
details. For command line SSH access, you can either use the key
downloaded by the GUI, or download the key manually:
Use SCP to copy the private OpenSSH key (
id_dsa), the public OpenSSH key (id_dsa.pub), and the Putty key (key.ppk).$scp keygen@192.168.10.1:* .keygen@192.168.10.1's password: id_dsa 100% 736 0.7KB/s 00:00 id_dsa.pub 100% 609 0.6KB/s 00:00 key.ppk 100% 807 0.8KB/s 00:00$Log in to Kernun UTM as user
rootusing the newly obtained key.$ssh -i id_dsa root@192.168.10.1Enter passphrase for key 'id_dsa': ...[root@fw ~]#Delete the key files in the home directory of user
keygen.[root@fw ~]#rm ~keygen/*Disable the
keygenaccount.[root@fw ~]#pw lock keygenLog out from Kernun UTM.
[root@fw ~]#logoutConnection to 192.168.10.1 closed.$
The steps after the first one are not strictly necessary, but they are
recommended for security reasons. Although the secret SSH keys are
protected by a passphrase, they should be kept in a secure store that
can be accessed only by authorized administrators. If the key is downloaded by
the GUI, the key files on Kernun UTM as well as the
keygen account are automatically
removed when the GUI connects to Kernun UTM with the downloaded key for
the first time.
In this section, we assume that the reader has at least the
basic knowledge of the Kernun GUI. An introduction to the Kernun GUI can be
found in Section 1, “Graphical User Interface” of this manual. The installation and
its related tasks are controlled by the Kernun GUI System
Manager, which is accessible using the

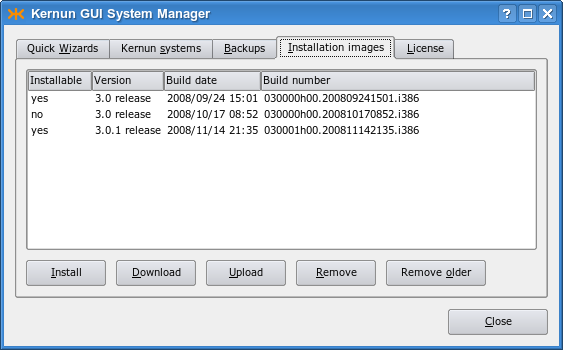
The installation is done from the Installation
images tab in the System Manager window, see Figure 2.4, “Installation images in the System Manager”. It displays a list of available
installation images (stored on Kernun UTM in
/kernun/dist). An image is marked as
installable if it is either a full image, or a patch image with an
available base image. The version number, build date, and build
number are listed for each image. Installation images can be copied
from the administrator's local machine, where the GUI runs, to
Kernun UTM by clicking the button.
The button can be used to copy
in the opposite direction. It is also possible to
delete a selected image () or all
images older than the selected one[7] ().
Tip
Each installed image is is copied to
/data/dist. As the images may consume a lot of
disk space on a regularly updated Kernun UTM, it is recommended to
delete old images regularly or when you need more space on the data
disk. An easy way to do this is to select one of the newest images
and click .
It is usually sufficient to retain only the one or two most recent
images.
To initiate the installation of the selected image, click the button. In the example, we will install the newest (last) installation image from the list. The installation of Kernun UTM can be alternatively initiated using the button on the Quick Wizards page. A wizard window (see Figure 2.5, “Selection of the installation target”) appears and prompts you to select the target system partition. It displays the number and label of the system partition that contains the currently running system. This partition cannot be overwritten by the installation. One of the other two system partitions, which are also listed with their labels, needs to be chosen. If you started the wizard from the Quick Wizards page, you are then supposed to choose the desired installation image. Finally, the recapitulation of the selected values is displayed. Click the button to launch the installation process (it deletes all the existing content of the selected partition).
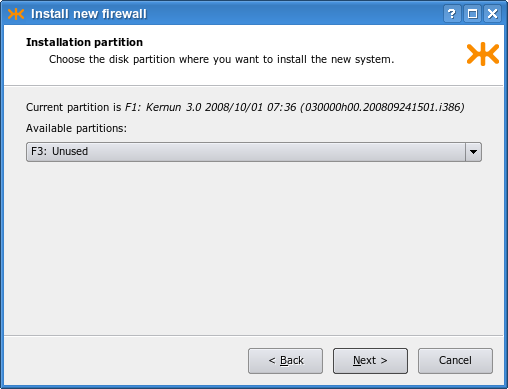
Caution
When performing an installation, make sure that you have selected the correct system partition, in order to avoid inadvertently overwriting a system partition that you want to retain.
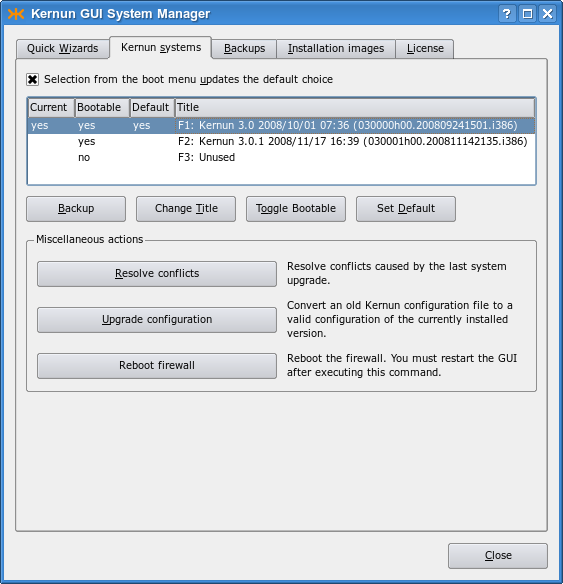
The installation process takes several minutes; it can be aborted using a button in the progress dialog displayed in the meanwhile. The newly installed system partition is made bootable, but the default boot partition is not changed. The reason is that the new Kernun UTM instance is not configured and until its initial configuration is performed from the console, it will be inaccessible via the network. The boot manager configuration after the finished installation can be viewed in the System Manager's Kernun systems tab, as shown in Figure 2.6, “The system partitions after the installation”. It is possible to change the partition label (using the button) or make the new system partition the default boot partition (the button).
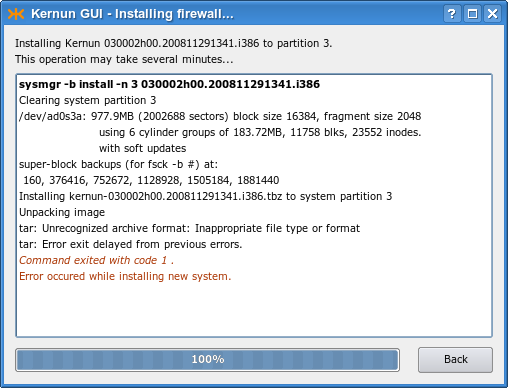
If the installation process terminates because of an error, the output of the failed command is displayed. The example in Figure 2.7, “An error during the installation” shows an error message caused by a corrupted installation image file.
The command line installation functionality is provided by
the
sysmgr(8) and
bootmgr(8) utilities. An installation
image that is to be installed must be stored in the
/data/dist directory, along with the
corresponding base image(s), if it is a patch image. The existing
images can be listed using the following command:
[root@fw ~]#sysmgr images* 030000h00.200809241501.i386 030000h00.200810170852.i386
The installable images are marked with an asterisk. The image
is a patch image that cannot be installed,
because its base image is missing. Information about the currently installed
instances of Kernun UTM can be obtained using the
bootmgr command or from the
/kernun-version file. In order to get access to this
file in other system partitions, the file systems in those partitions
need to be mounted first.
[root@fw ~]#bootmgrBoot manager on /dev/ad0 F1: Kernun 3.0 2008/10/01 07:36 (030000h00.200809241501.i386)[root@fw ~]#cat /kernun-version030000h00.200809241501.i386[root@fw ~]#mount /2[root@fw ~]#cat /2/kernun-version030000h00.200810170852.i386[root@fw ~]#mount /3mount: /dev/ad0s3a on /3: incorrect super block
The bootmgr command displays labels of the
system partitions and the number
of the system partition that contains the currently running system
. The second system partition in
the example contains another Kernun UTM version , even though it was manually relabeled as
“Unused”. The third system partition is really unused;
it does not even contain a file system .
We will install a new Kernun UTM version in the second system partition. We choose the newest version available according to the sysmgr images report. Unlike the standalone installer described in Section 5.1, “Standalone Installer”, the command line installer asks no questions. The image build number and the target system partition number are given on the command line and the installation starts immediately. The standard partition label, containing the Kernun UTM version, date of installation, and build number, is set for the newly installed partition. The initial configuration process (see Section 5.2, “Initial Configuration”) is started after booting from the newly installed system partition.
[root@fw ~]#sysmgr install 2 030001h00.200811142135.i386Clearing system partition 2 ... Installing kernun-030001h00.200811142135.i386.txz to system partition 2 Unpacking image Installing SSH host keys Removing file system content databases for installed images Creating /etc/fstab Writing build number into /kernun-version Creating file system content database Installation successfully finished[root@fw ~]#bootmgrBoot manager on /dev/ad0 F1: Kernun 3.0 2008/10/01 07:36 (030000h00.200809241501.i386) F2: Kernun 3.0.1 2008/11/17 16:39 (030001h00.200811142135.i386) F3: Unused type=Kernun 1024 B boot manager (74 character labels) current_booted=1 bootable=1 2 update=yes default_selection=F2
Caution
Be careful when running sysmgr install. Especially, make sure that you specify the correct system partition number. Otherwise, you might inadvertently overwrite a system partition that you would like to retain.
Caution
The newly installed system partition is made the
default choice for the next boot. As it is not configured, it will
be inaccessible via the network after the reboot and its initial
configuration will need to be performed from the console. If you want to
keep the current default boot partition, so that you retain a fully
working system after the reboot, use the -n
parameter of the sysmgr command:
[root@fw ~]#sysmgr install -n 2 030001h00.200811142135.i386
Typically, the interaction with Kernun UTM is performed using a VGA console. However, in some cases it is neccessary to switch the system output to a serial console, which is also available on most of Kernun devices. In order to redirect the output to a serial console, plug-in the console to a serial port, restart Kernun UTM, and follow these steps:
Press <Space> repeatedly until the booting process prompts with
boot:When the prompt
boot:appears, type “-h” and confirm by pressing<Enter>. The output of booting proccess should now be redirected to the serial console and continue.>> FreeBSD/i386 BOOT Default: 0:ad(0,a)/boot/loader
boot:-h
[2] You can use dd
on Linux / BSD or
ImageWriter on Windows to copy the USB flash drive image
to the device.
[3] It is usually the first disk: da0
(SCSI), ad0 (PATA), ad10
(SATA).
[4] including
usr/local/kernun/license.dat
[5] More precisely speaking, the initial
configuration script is executed during any system boot if there is no
Kernun UTM configuration file
/usr/local/kernun/conf/kernun.cml and none of
the files /etc/rc.conf and
/etc/rc.conf.local contain the line
kernun_config_enable=NO.
[6] The host key is used by the SSH client (or GUI) to ensure that it is communicating with the intended server. It is different from the client's key, which is used to authenticate the client to the server.
[7] An image is considered older if it has a lower version number or an earlier build date.