Kernun UTM provides both GUI and command line tools used to back up
system partitions and restore data from backups created in this way.
They can be used to back up not only the current system partition, but
any of the three system partitions. A backup file does not contain
the complete contents of a system partition, but only the changes made
since its installation. The size of the backup file therefore depends
on the amount of changes that have been made in the system partition
since its last installation. After an installation, the content of a
system partition is stored in the
/kernun-installed.fsdb.bz2 file. When doing
backup, this file is compared with the current content of the system
partition. Added and modified files are stored in the backup file,
along with information about deleted files and files with changed
metadata attributes[8].
The backup and restore operations process only a subset of files
contained in a system partition, mainly Kernun configuration files.
The list of files included in a backup can be viewed and modified
in the /etc/kernun-fsdb-include file. During
backup and restore operations, this file is passed to
diskdb(1)
using the -I parameter.
Backup files are stored in the /data/backup
directory, from which they should be copied to a safe place.
They should not be renamed, because their names contain
important information for backup processing: the build number of
the Kernun UTM instance, the number of the backed up system partitions,
and the date and time when the backup was created.
A backup created on a particular Kernun UTM version (build number) should
be restored to a system partition containing a newly installed image with
the same build number. On the other hand, a system partition with any
partition number can be used for restoring, not only the one where the backup
was created. The restore program adjusts the contents of the file system table
/etc/fstab accordingly.
Kernun UTM provides tools for manual backup and
restoring of system partitions using local backup files in
/data/backup. The administrator should create a backup
at least after every major configuration change and copy it to a storage
medium other than a local disk. Solutions for automated backup, remote backup,
or backup of the data partition are not provided out of the box, because
backup policies required for different deployments vary significantly.
More sophisticated backup scenarios can be implemented using
operating system tools
(tar(1),
cron(8), etc.) or various third-party
backup software. The Kernun UTM tools support only complete restoring of
a backup to a newly installed system partition. Nevertheless, a backup file is a
tar(1) archive compressed by
bzip2(1) and can therefore be freely
manipulated using these tools.
In some situations, especially when a backup is restored to a different version of Kernun UTM or to a system partition that has been modified since the installation, conflicts may be reported during restoring. It is also possible that unresolved conflicts from an earlier restore operation interfere with the current one. In such a case, the old conflicts need to be resolved or discarded first. See Section 7, “Upgrade” for explanation of conflicts and instructions on how to resolve them.
A backup can be created in the GUI in the Kernun
systems tab of the System Manager (Figure 2.6, “The system partitions after the installation”). All you need to do is select a system partition
and click on the button. A backup file will be
created and stored in /data/backup. The new
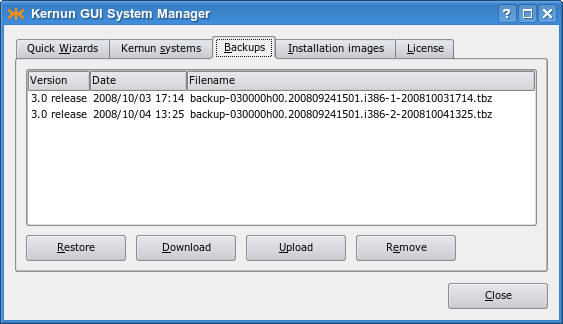
backup will appear in the Backups tab, see Figure 2.8, “Existing backup files in the GUI”. Using buttons under the list of backup files,
a file can be downloaded to the administrator's computer, uploaded
back to Kernun UTM, or removed.
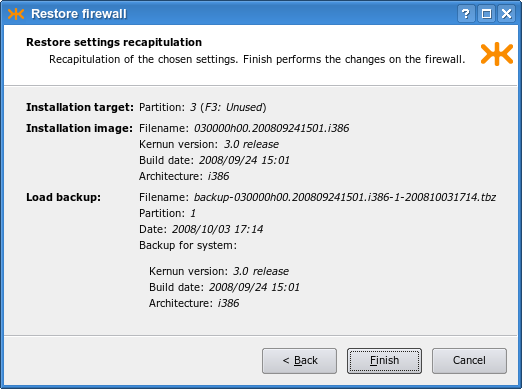
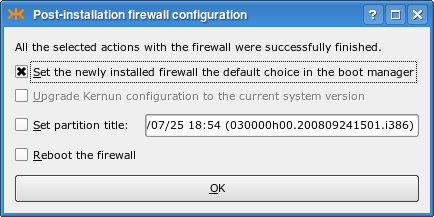
Click on the button if you want to start the restore operation. Alternatively, restoring can be initiated using on the Quick Wizards page. A wizard window appears. It prompts for the target system partition (must not be the currently booted one), for selection of a backup file and for a corresponding installation image. There are also buttons for uploading a locally stored backup or image to Kernun UTM. As the last step, the recapitulation of the selected values is displayed, as shown in Figure 2.9, “Parameters of a restore operation”. When you click , the selected image is installed in the chosen system partition and the selected backup is unpacked. Then it is possible to do any combination of the following operations: set the newly restored partition as the default boot partition; change the partition label; reboot Kernun UTM immediately (see Figure 2.10, “Final settings after restoring a backup”).
The
sysmgr(8) utility is used to create
and restore backups from the command line. A new backup file in
/data/backup is created by the following command:
[root@fw ~]#sysmgr backup 2Creating backup content database /kernun-backup.fsdb.bz2 Creating file system content database Creating backup file /data/backup/backup-030000h00.200809241501.i386-2-200807281400.tbz[root@fw ~]#
If a backup of the current system partition is to be created, the
partition number (2 in our example) may be
omitted. A list of existing backup files is displayed by
[root@fw ~]#sysmgr backupsbackup-030000h00.200809241501.i386-1-200810031714.tbz backup-030000h00.200809241501.i386-2-200809261822.tbz backup-030000h00.200809241501.i386-2-200809301350.tbz
A backup can be restored to a selected system partition; it must not be the currently used system partition. A clean installation of an image with the correct build number should be done first.
[root@fw ~]#sysmgr install 2 030000h00.200809241501.i386... Installation successfully finished[root@fw ~]#sysmgr restore 2 \>backup-030000h00.200809241501.i386-1-200810031714.tbzProcessing changes of file system contents Unpacking files from backup Resolving conflicts All conflicts resolved[root@fw ~]#
An attempt to restore a backup in a system partition that contains a Kernun UTM instance with a different build number is detected and a warning is displayed:
[root@fw ~]#sysmgr restore 2 \>backup-030000h00.200809241501.i386-1-200810031714.tbzBackup is from different build than currently installed in /2. Installed: 030001h00.200811142135.i386 Backup: 030000h00.200809241501.i386 It is strongly recommended to restore a backup to the Kernun build that was used for creating the backup. Continue anyway (y/n)?n[root@fw ~]#
A backup can be restored also from the standalone
installer booted from the Kernun UTM installation medium. This can be helpful
after installing a new system disk or when moving a Kernun UTM installation
to a new computer. First, select a system partition and install Kernun UTM
from an image corresponding to the backup that is to be restored,
following the procedure described in Section 5.1, “Standalone Installer”.
If the backup file is not already located in /data/dist,
you can copy it there using the emergency repair environment
tools, as described in Section 9, “Emergency Repair Environment”.
*** KERNUN INSTALLATION *** Build 030001h00.200811142135.i386 1. Install Kernun 2. Check for existing Kernun installations 3. Restore backup 4. Start rescue shell 5. Mount Kernun file systems 6. Resize installer's in-memory temporary file system (current size 32m) 7. Halt 8. Power down 9. Reboot 0. Install license Select action:1Detected Kernun system disk ad0 Detected Kernun data disk ad0 Repartition disks (y/n)? n Current Kernun installations: Boot manager on /dev/ad0 F1: Kernun 3.0 2008/10/01 07:36 (030000h00.200809241501.i386) F2: Kernun 3.0.1 2008/11/17 16:39 (030001h00.200811142135.i386) F3: Unused type=Kernun 1024 B boot manager (74 character labels) current_booted= bootable=1 2 update=yes default_selection=F2 Select partition for installation (1 2 3) [1]:
3Overwrite partition /dev/ad0s3 by new Kernun installation (y/n)?
yAvailable installation images: 1 030000h00.200809241501.i386 2 030001h00.200811142135.i386 Select image to install (1-2) [2]:1Enter the label that will be used to identify this installation in the boot manager. The label can be at most 44 characters long. The Kernun build number will be appended after the entered label automatically. Label [Kernun 3.0 2008/11/20 10:26]: Clearing system partition 3 ... Installing kernun-030000h00.200809241501.i386.txz to system partition 3 ... Installation successfully finished Press Enter for return to menu... *** KERNUN INSTALLATION *** Build 030001h00.200811142135.i386 1. Install Kernun 2. Check for existing Kernun installations 3. Restore backup 4. Start rescue shell 5. Mount Kernun file systems 6. Resize installer's in-memory temporary file system (current size 32m) 7. Halt 8. Power down 9. Reboot 0. Install license Select action:
3Select partition to be restored (1 2 3) [1]:
3Available backups for build installed in partition 3: 1 backup-030000h00.200809241501.i386-1-200810010405.tbz 2 backup-030000h00.200809241501.i386-1-200810040604.tbz Select backup to restore (1-2) [2]:
1Restoring backup-030000h00.200809241501.i386-1-200810010405.tbz to partition 3 Are you sure (y/n)?
yConflicts resolution data in /data/restore already existRemove old /data/restore (y/n)?
yProcessing changes of file system contents Unpacking files from backup
Resolving conflicts All conflicts resolved Press Enter for return to menu...
In the example above, we assume that the backup file is already
stored in the /data/backup directory and the corresponding
installation image in the /data/dist directory. We
start the backup restoring procedure by carrying out a fresh Kernun UTM
installation in an unused system
partition . The installation image is chosen so that it corresponds to the
backup file that will be restored. After returning to the installer
main menu, we select
. The partition installed in the previous step should be
selected. A list of backups compatible with the content of the target
system partition is displayed. We choose one of the offered backup
files and the restoring begins. The
message indicates that there are
unresolved conflicts from previous restore or upgrade operations.
Usually, you should reply n to the question
. This will interrupt the
restore operation. You can restart it after you resolve the conflicts
according to instructions given in Section 7, “Upgrade”. If you are
sure that you do not need to resolve the old
conflicts[9], you may reply
y and the conflict resolution data will be
deleted. The message and question concerning the old conflicts
will not be displayed if there are no pending conflicts. Finally , the backed up files are unpacked from the backup
file and checked for conflicts. No conflicts should occur if the
backup is restored to the same Kernun UTM build that was installed at the time
the backup was created. The restored files are installed in their
proper places and the restore operation successfully finishes.