The upgrade procedure described in this section is applicable if you want to retain as much as possible from the configuration of the old Kernun UTM instance in the new instance. If you want to configure a new Kernun UTM version from scratch, follow the installation and configuration procedures described in Section 5, “Installation”.
Upgrading to a new version or build of Kernun UTM is basically done by restoring a backup of the old version in a system partition that contains a fresh installation of the new version. The upgrade procedure comprises the following steps:
The syntax and semantics of the configuration files are sometimes slightly changed between versions. In order to be usable in the new Kernun version, the old configuration file must be converted in step 1. This is done automatically during the upgrade process. The configuration conversion script expects the configuration in a normalized format. Using just some formatting accepted by normal Kernun configuration tools (GUI or CML) is not sufficient. The normalization during the upgrade process is done either automatically (by GUI), or using a command in the command line upgrade.
Important
If you are upgrading from a Kernun version that does not implement automatic configuration normalization during the upgrade process, that is, from a version older than 3.3.2, you should perform the normalization manually. It can be done simply by opening and saving the configuration by either GUI, or CML. The normalization step may be skipped if the configuration has been saved recently and has not been modified outside the Kernun configuration tools, for example, by a text editor.
The upgrade operation results in a newly installed system partition
that contains the new version of Kernun UTM. If we want to keep the configuration
across upgrades, we need to copy the main Kernun UTM configuration file
/usr/local/kernun/conf/kernun.cml and any other
changes done in the old installation to the new one. The configuration files
that have been changed, created, or deleted since the installation are
found and saved when the old system partition is backed up in
step 2.
Step 3 requires a full or patch installation image. Although it is possible to replace the contents of the currently used system partition with the new version, it is not recommended. You should always install an upgrade to a currently unused system partition, for two reasons. First, the old Kernun UTM instance can continue running until the upgrade is finished. Second, you can quickly return Kernun UTM to an operational state if something goes wrong with the upgrade.
Tip
The recommended practice is to use two system partitions for regular upgrades. One partition is occupied by the currently running version, while the other contains the old version and will be used for installation of the next upgrade. After each upgrade, the roles of the two partitions are switched. The third system partition can be reserved for special tasks, such as preparation of a completely new configuration.
Tip
Set the boot manager (as described in Section 4, “Boot Manager”) default boot partition so that it always boots the currently used Kernun UTM instance. Consider disabling the automatic updating of the default boot partition or disabling the unused partitions altogether.
Restoring of the backup from step 2 in the system partition installed in
step 3 effectively copies the
complete configuration from the old system partition. Restoring of a backup
to a build different from the one used for its creation may cause
conflicts. These are files that cannot be restored
automatically and a manual intervention of the administrator is necessary.
A conflict occurs if there are two incompatible changes of the same file.
The original version of the file comes from the installation image of
the Kernun UTM instance that is being upgraded; we will call it “old”. The
second version (called “backed-up”) is contained in the backup file,
if the file was changed[10] at some time between the installation of the old
version and the start of the upgrade process. The third version
of the file (called “new”) is obtained from the installation image of
the new Kernun UTM instance installed in step 3. There are two potential changes of the
file. One between the old and the backed-up version, the second between
the old and the new version. If only one change exists, no conflict occurs
and the changed (backed-up or new) version of the file will be used. For
example, /etc/ttys may have been
changed by the administrator in the installed Kernun UTM, but remains the same in
the build we are upgrading to. Another example is a proxy executable,
which is modified in the new Kernun UTM version, but left unchanged by the
administrator. If all three versions exist, i.e. when the backed-up
and the new version differ, a conflict occurs. The automated upgrade tools
are unable to handle the file and the administrator must decide whether
the new file, the backed-up file, or some combination of the two should be
used. For example, a third party software added in the new build
creates a new user account in /etc/master.passwd, and the
administrator has created another user account. During the upgrade, a conflict
is reported for /etc/master.passwd. The administrator
can resolve this particular conflict by merging the two versions of the file,
adding both new user accounts to the resulting file.
The detected conflicts are recorded in the
/data/restore/resolve file during step 4. The conflicting files from the backup
file (the “backed-up” version) are not unpacked to the
root directory tree. Instead, they are stored in corresponding locations
under the /data/restore/conflicts directory. The root
directory tree contains the files as installed (the “new”
version). In step 5, the
administrator specifies for each file how the conflict should be resolved,
choosing from the following possibilities:
The new version is retained and the backed-up version is deleted from
/data/restore/conflicts.The backed-up version replaces the new version.
The new or the backed-up version is used, but is modified first, for example by merging the contents of the two versions in a text editor.
The conflict is postponed until a later iteration of conflict resolution.
The /data/restore directory is deleted when all conflicts
are resolved. Only one upgrade procedure can be in the conflict resolution
stage at a time. If a conflict resolution session is started and there is
already the /data/restore directory with unresolved
conflicts, the administrator can either cancel the second resolution, or
delete the old /data/restore directory, thus effectively
using the “new” versions of the files for all conflicts in the earlier
conflict resolution session.
In step 6, a script is executed
that edits the contents of the main configuration file
/usr/local/kernun/conf/kernun.cml to make
it compatible with the upgraded Kernun UTM. Sometimes, if there
are complex changes in the configuration syntax and semantics between
the two Kernun UTM versions, or if the configuration file contains certain
advanced constructs, the script may be unable to perform a perfect
conversion. It is therefore recommended to always check the result of the
automatic conversion in step 7.
The new configuration file needs to be applied before the upgraded system can be put into normal operation. The low-level configuration files are generated and the configuration is applied in the context of the newly installed system using the applycfg command of sysmgr(8). If the generation or application of the configuration fails, the configuration should be corrected and applied again.
Finally, the upgraded Kernun UTM can be put into the normal production mode by rebooting to the newly installed system partition.
No modifications of the configuration (steps 6 and 7) are often required during the upgrade procedure. This is usually true when upgrading between two builds of the same version or between patch releases of the same version, for example, from 3.0 to 3.0.1 or from 3.0.1 to 3.0.2.
An upgrade is initiated from the Quick Wizards page of the System Manager. There are two alternatives. Click if you want to start the complete upgrade procedure. If you already have a recent backup of the system partition that you want to upgrade, you can skip the first step — creation of a backup. In this case, use the button. We will describe only the former alternative; the latter is almost identical, only the backup step is missing.
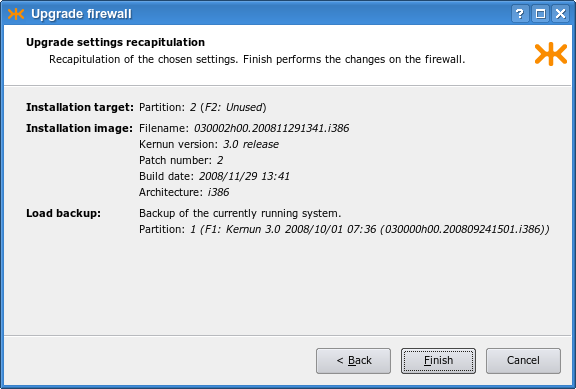
The GUI assumes that we want to upgrade the currently running Kernun UTM instance. Therefore, the current system partition will be backed up. After clicking on the button, we select the target system partition in which the upgraded Kernun UTM will be installed. Then we select the installation image of the new version. Our selections are displayed in the settings recapitulation window (Figure 2.11, “Parameters of an upgrade operation”). Click on the button to start the upgrade.
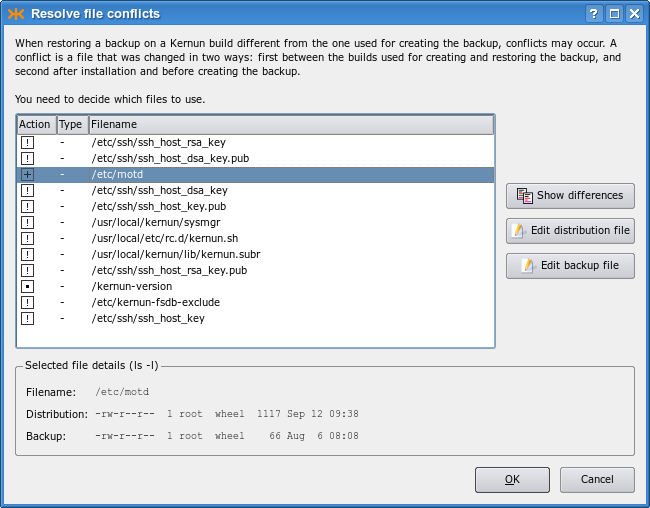
The GUI displays the progress of the upgrade procedure. First, the current system partition is backed up. Then, the new system partition is installed and the backup is restored in it. If there are any conflicts, the conflict resolution window is displayed, as shown in Figure 2.12, “The conflict resolution window during an upgrade”. The window shows a list of conflicting files. You can determine how to resolve the conflict of a file by clicking in the Action column. The following actions are possible:
+— uses the “backed-up“ version of the file;.— uses the “new” version of the file, as installed from the new installation image;-— deletes the file;!— postpones the conflict to the next iteration of conflict resolution.
It is also possible to select a file and then click a button on the right-hand side of the window to display the differences between the two versions of the file, or to open one of them in an editor.
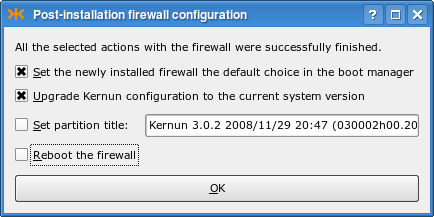
After you give instructions for conflict resolution and optionally edit some conflicting files, click to have the conflicts resolved. Finally, a window is displayed (see Figure 2.13, “Final settings after an upgrade”) that makes it possible to realise any combination of the following actions: set the newly upgraded system partition as the default boot partition; run the configuration conversion script; change the partition label; reboot Kernun UTM immediately.
Command line upgrades are realized using the sysmgr(8) utility. Unlike when using the GUI, which performs all the required steps automatically, a command line upgrade must be done step by step. An example of the upgrade procedure follows:
[root@fw ~]#cml -l -f /usr/local/kernun/conf/kernun.cmlRCSL-730-N File '/usr/local/kernun/conf/kernun.cml' locked for current user CMLM-790-N RCS command completed[root@fw ~]#sysmgr checkcfg... Configuration is correct[root@fw ~]#sysmgr backupCreating backup content database /kernun-backup.fsdb.bz2 Creating file system content database Creating backup file /data/backup/backup-030000h00.200809241501.i386-1-200811300006.tbz
[root@fw ~]#sysmgr install 2 030002h00.200811291341.i386Clearing system partition 2 ... Installation successfully finished
[root@fw ~]#sysmgr upgrade 2 \>backup-030000h00.200809241501.i386-1-200811300006.tbzProcessing changes of file system contents Unpacking files from backup Resolving conflicts There are pending conflicts, see /data/restore/resolve *** CONFLICT RESOLUTION ***
1. Resolve with easy editor (ee) 2. Resolve with editor vi 3. Do not resolve now Select action:
2# Conflict resolution file for system partition /2# Each line of this file contains an instruction for one file. You # can edit the file and then apply the instructions by running # "sysmgr resolve". Every line contains three fields: # - one character that defines an action to be done with the file # - one character for file type ('d' for a directory, '-' for any # other type) # - path to the file, interpreted either relative to /2 for the # existing file and relative to //data/restore/conflicts # for the file from the backup # Procedure of conflict resolution: # 1. Locate all lines beginning with '!'. These denote conflicting # files. # 2. Optionally edit the conflicting files. # 3. Change the character '!' to # + ... to use the file from backup, temporarily stored in # /data/restore/conflicts # . ... to keep the current file # - ... to delete the current file # ! ... keep the conflict for future resolution # 4. Run "sysmgr resolve". # 5. Repeat steps 1-4 until all conflicts are resolved. # Merging file from the backup with the current file can be done # either by editing the current file and specifying action '.' # (keep) or editing the file from the backup and specifying # action '+' (use backup). ! - ./etc/motd ! - ./etc/login.conf ... Resolving conflicts There are pending conflicts, see /data/restore/resolve

[root@fw ~]#vi /data/restore/resolve...
[root@fw ~]#sysmgr resolveResolving conflicts All conflicts resolved
[root@fw ~]#sysmgr upgradecfg 2Upgrading Kernun configuration /2/usr/local/kernun/conf/kernun.cml /2/usr/local/kernun/conf/kernun.cml,v <-- /2/usr/local/kernun/conf/kernun.cml new revision: 1.2; previous revision: 1.1 done Automatic configuration upgrade done. It is recommended to review the configuration before returning Kernun UTM to production use.
[root@fw ~]#sysmgr applycfg 2... System kernun applied in system partition 2
[root@fw ~]#cml -u -f /usr/local/kernun/conf/kernun.cmlCMLM-790-N RCS command completed[root@fw ~]#
Before upgrade, the configuration should be locked
 [11], checked and
normalized
[11], checked and
normalized  . This step ensures that
the configuration upgrade step will
understand the configuration file. The upgrade procedure starts by
backing up the current system partition .
Specify a system partition number to upgrade a currently
inactive partition. If a recent backup already exists, this step can
be skipped. A new Kernun UTM version is installed to an unused system
partition . This command also sets
the default boot manager label for the newly installed partition, and
makes it bootable and the default boot selection for the next booting.
The backup is then restored to the newly installed system partition
. This command writes the list of
conflicts to
. This step ensures that
the configuration upgrade step will
understand the configuration file. The upgrade procedure starts by
backing up the current system partition .
Specify a system partition number to upgrade a currently
inactive partition. If a recent backup already exists, this step can
be skipped. A new Kernun UTM version is installed to an unused system
partition . This command also sets
the default boot manager label for the newly installed partition, and
makes it bootable and the default boot selection for the next booting.
The backup is then restored to the newly installed system partition
. This command writes the list of
conflicts to /data/restore/resolve. The
conflicting files from the backup are stored in the
/data/restore/conflicts directory. If there are
conflicts, the conflict resolution menu is displayed . You can either resolve the conflicts,
or postpone the conflict resolution to do it later. If you choose
to resolve the conflicts, the conflict resolution file
/data/restore/resolve is opened in a text editor.
Edit the file according to the displayed instructions to determine the way of resolution
of individual conflicts. After the file is saved and the editor is
terminated, the conflict resolution is executed in accordance with
the file. If some conflicts remain unresolved, a message is printed. It is then possible to
edit /data/restore/resolve manually and restart the conflict resolution
. Commands and can be repeated until all
conflicts are resolved. The main configuration file is
upgraded and applied . Finally, the lock is released  . You can then reboot to
the new system partition and start using the upgraded Kernun UTM.
. You can then reboot to
the new system partition and start using the upgraded Kernun UTM.
[10] By a change, we mean modification of the contents of the file, deletion of the file, a change of the file attributes (e.g., the owner or access rights), or creation of a previously nonexistent file.
[11] Steps and
are supported by Kernun since
release 3.6. In the prior versions, these steps should be
skipped.