Kernun Branch Access is a device with the primary task to provide a remote branch of a company with a secure connection to a central Kernun UTM. In addition, Kernun Branch Access provides another security features for the perimeter of the network such as network packet filtering and VPN. Optionally, the device can also serve as a Remote Access Server for VPN. Kernun Branch Access is designed to be used together with Kernun UTM and should not be used separately.
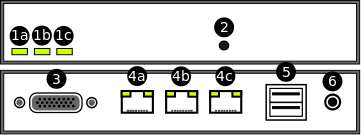
Status LEDs (1a, 1b, 1c) — Three LEDs, which are intended to indicate the status of some key functions of the device.
Button — Serves for confirming configuration application and starting the Remote Help Service. In order to press the button, use a paperclip or a similar tool.
A serial console connector
Ethernet ports (4a, 4b, 4c) — Kernun Branch Access is equipped with three Ethernet ports. The ports serve for connecting the device to LAN and WAN.
USB ports — Kernun Branch Access is equipped with two USB 2.0 ports.
Power supply input
In order to power Kernun Branch Access on and connect it to the network properly, the following steps should be taken:
Plug-in a power supply connector to the power supply input (6)
Plug-in an Ethernet cable connected to LAN into an Ethernet port (4b)
Plug-in an Ethernet cable connected to WAN into an Ethernet port (4a)
In order to install Kernun Branch Access, you need a Kernun Branch Access installation medium[46]. Since the device is equipped with serial console output only, it is also necessary to modify installation process according to the guide described in Section 5.5, “Enabling Serial Console Output”. After this modification, the operating system will output to serial console while booting and the installation will be similar to the installation of Kernun UTM from standalone installer described in Section 5.1, “Standalone Installer”.
Configuration of Kernun Branch Access can be performed in two different ways:
Initial configuration using a USB flash drive, which is typically applied when Kernun Branch Access is configured for the first time.
Standard configuration applied remotely from a central Kernun UTM.
Both of the configuration options will be described in the following sections.
Kernun Branch Access is usually supplied in the form of a compact device configured to default factory settings. Since the supplied device has no active network connection available yet, no remote configuration technique similar to the one described in Section 24, “High Availability Clusters” can be used. In order to configure the Kernun Branch Access for the first time, it is necessary to apply the configuration using a USB flash drive.
The procedure consists of two steps. Firstly, the configuration for Kernun Branch Access is defined on the central Kernun UTM and then, using a series of commands, it is exported into a special configuration file. Secondly, the exported file is copied to an arbitrary USB flash disk and the disk inserted into one of USB ports on the device. The whole procedure is described in details in the following paragraphs:
Exporting a configuration file from a central Kernun UTM
Defining configuration for Kernun Branch Access on central Kernun UTM
The configuration is defined as a single
systemsection (see Section 2.2, “System” for more details onsystemconfiguration basics).Generating and exporting the
systemconfiguration into a file using the kat(8) command line toolThe tool can be launched either directly using an SSH remote access to the terminal of the central Kernun UTM or by pressing the GUI Console icon (marked as number 6 in Figure 3.14, “Main window toolbar buttons, listed together with the corresponding menu items, and sometimes keyboard shortcuts:”).
KAT@central-utm>cmlCMLR-710-K File '/usr/local/kernun/conf/kernun.cml' loadedCML>/generate... CKGB-710-N ---- Preparing files for system 'kba-office'... ... CKGB-719-N ---- System 'kba-office' successfully generatedCML>/quitCMLI-709-N CLI interactive mode closedKAT@central-utm>export kba-officeCMLK-821-N [root] Exporting 'SYSTEM-kba-office' configuration Exporting configuration to /root/SYSTEM-kba-office.tar tar: Removing leading '/' from member namesKAT@central-utm>quitAfter applying the
exportfunction, the configuration file namedSYSTEM-kba-office.tarshould be exported to the home directory of the user who launched the command.Transporting the generated file to the administrator manipulating the Kernun Branch Access.
In case the administrator who generated the configuration file does not have physical access to Kernun Branch Access, the file must be transported to the administrator manipulating the device itself. It might, for example, be sent by an e-mail.
Preparing and inserting the configuration USB flash drive into Kernun Branch Access
Once the configuration file is exported and delivered to the administrator having physical access to Kernun Branch Access, the following steps should be taken:
Copy the configuration file (e.g.
SYSTEM-kba-office.tar) to the root directory of an arbitrary USB flash driveInsert the USB flash drive into one of USB ports of Kernun Branch Access (5)
After inserting, the device will beep once shortly and then wait 30 seconds for confirming the application by pressing the button (2). If the timeout runs out, the device will beep nine times shortly and no configuration will be applied. In such case, the USB flash drive must be reinserted and confirmed.
Confirm the configuration by pressing the button (2) with a paperclip or a similar tool
If the button is pressed, the device beeps three times shortly and automatically starts the configuration process. If the process succeeds, the device beeps once longly, otherwise it beeps three times longly.
After successful configuration, the network connection with central Kernun UTM should be established and Kernun Branch Access can be further configured remotely using the process described in the following section.
Note
The way of configuration using a USB flash drive is primarily intended for setting the very first configuration, when Kernun Branch Access has no network connection with the central Kernun UTM available. However, it may be reused arbitrarily when needed in the future.
If the initial configuration using a USB flash drive has already been
successfully applied, Kernun Branch Access can be further configured remotely.
The desired configuration can be prepared as a standalone system on the central Kernun UTM
with apply-host configuration directive applied. Instructions for
proper setting and applying the apply-host directive can be found at
Section 24, “High Availability Clusters”.
Kernun Branch Access is intended to operate without a monitor or any kind of a administrator's console. Therefore, it has only limited possibilities to indicate its current state or communicate with users and administrators. Three build-in LEDs serve for basic diagnostics of the key functions of Kernun Branch Access. In this section the meaning and the purpose of each LED will be described. It will also be explained how the Remote Help Service can be started and what its purpose is. Finally, steps to be taken in order to reset the device back into the default factory settings will be described.
Kernun Branch Access is equipped with three LEDs, which are intended to indicate the status of some key functions of the device. The meaning of each LED is as follows:
The left LED (1a)
Indicates whether Kernun Branch Access is powered on. If so, the diode should light continuously without interruptions.
The middle LED (1b)
Indicates a status of all configured KBA components after a boot of the system. After the system boots, the diode starts to blink, which indicates that the KBA components are being verified. If all the components are successfully started, Kernun Branch Access beeps once long and the diode starts to light continuously. If not, Kernun Branch Access beeps three times long and the diode turns off.
The right LED (1c)
Serves for indicating a status of the Remote Help Service. When the service is started by pressing a Remote Help Service button (see Section 25.4.2, “Remote Help Service Button”), the diode will blink quickly until the service is ready (the process should not last longer then 60 seconds). If the service was started successfully, the diode should begin to light continuously, if not, it turns off. Similarly, when the service shuts down, the diode begins to blink until the process is finished and then it turns off.
The Remote Help Service is a service allowing the technicians of the manufacturer of Kernun UTM temporary access to Kernun Branch Access in order to diagnose and maintain it remotely. The service can be both started and stopped by pressing the button located on the front side of the device. The entire starting procedure consists of the following steps:
Press the button (2) with a paperclip or a similar tool for 5 seconds.
The right LED (1c) starts to blink.
When the right LED begins to light continuously, the Remote Help Service was started successfully. The diode will light all the time the service will be active.
[46] You can use dd on Linux / BSD or
ImageWriter
on Windows to copy the USB flash drive image to the device.