Kernun UTM can be administered locally, or remotely via the network. Local administrator access is usually limited to the initial installation, when the network is not yet configured, and emergency situations after a failure or misconfiguration if the network is not accessible. The administrator can access the system locally via a text system console. It provides the same set of command line tools as the remote text login via SSH. In normal operation, Kernun UTM is usually administered remotely. There are two options for remote access: a text command line interface and a graphical user interface.
An administrator can log in to Kernun UTM remotely via SSH and get shell access to the system. Administrative tools accessible from the shell include the primary Kernun UTM command line control and configuration tools kat(8) and cml(8), see also Section 2, “Command Line Interface”. Besides these two, many additional command line utilities are available, including specific Kernun UTM commands introduced in Section 3, “Administrative Utilities” and all the standard FreeBSD commands.
Kernun UTM's graphical user interface (GUI for short, described in Section 1, “Graphical User Interface”) provides a similar functionality as the command line utilities, but in a more intuitive and comprehensive way. It shows the current state of all system components and can display details for each component. The GUI contains also a powerful log analyzer, a configuration editor, and a system manager, which administers installations, backups, and upgrades. There is some functionality that is unique to the GUI and cannot be accessed from the command line, such as displaying of performance graphs. The GUI runs on the administrator's local computer and communicates with Kernun UTM via the network, using SSH internally. Hence, the same prerequisites are needed for both the command line and GUI access to Kernun UTM (especially, SSH keys and the SSH protocol enabled on the way between Kernun UTM and the administrator's computer).
In this section, we will introduce the Kernun GUI. In later chapters dealing with configuration (Chapter 4, Configuration Basics, and Chapter 5, Advanced features) we will assume that the administrator knows how to use the GUI.
The Kernun GUI is available in two functionally equivalent versions: for Microsoft Windows and for UNIX. The binary executables of the Kernun GUI are distributed for MS Windows and for FreeBSD [12]. The Kernun GUI can be easily compiled also for other UNIX platforms. See the README file for instructions on how to compile the Kernun GUI.
On UNIX machines, the Kernun GUI expects OpenSSH to be installed
(namely, the ssh, ssh-agent,
ssh-keygen and ssh-add programs are
expected to be located in a directory listed in the PATH
environment variable).
There are no prerequisites to be installed on MS Windows. All the necessary executables are included in the Kernun GUI distribution.
The Kernun GUI provides the following functionalities:
monitoring of the state of Kernun UTM;
management (starting, stopping, restarting, …) of Kernun UTM (or its particular components);
work with logs (both current online logs and downloaded offline logs) and statistics;
modification and application of the configuration of Kernun UTM;
administration of Kernun UTM installations, backups, and installation images.
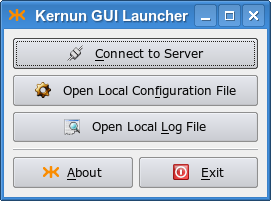
When the GUI is started, the launcher window is displayed, see Figure 3.1, “GUI Launcher”. The launcher provides buttons to open (and change) a local copy of the Kernun UTM configuration file (for more information on work with the configuration in the GUI see Section 1.4, “GCML — Configuration”) or examine a local log file (see Section 1.3, “Logs”). However, the main purpose of the GUI launcher is to establish a new connection to Kernun UTM and launch the main GUI management window.
The GUI communicates with Kernun UTM via
SSH connections. You therefore need to have the
sshd service running and correctly
configured (see Section 2.3, “SSH Server”).
The parameters of the SSH connection to Kernun UTM are specified in the
Connection Parameters dialog, as depicted in Figure 3.2, “Connecting to Server”. You need to fill in the
Host name or IP address of the Kernun UTM machine,
Username, Port and select the
SSH key file.
Tip
If you are connecting to Kernun UTM via SSH for the first time, you need to initialize Kernun UTM (i.e., download your private SSH key from Kernun UTM). To do this, use the dialog that appears after the button is pressed. Fill in the Hostname and the Password you entered during the installation. See also Section 5.2, “Initial Configuration”.
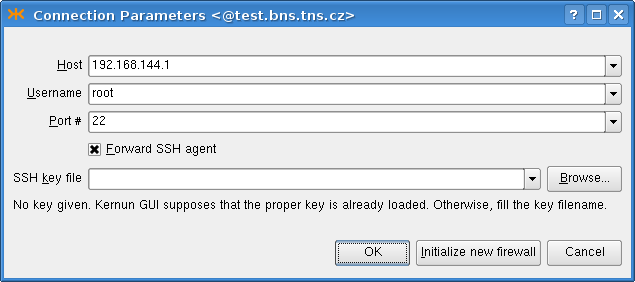
If you intend to apply the configuration to other Kernun UTM than the one you are logged in (for example, the second Kernun UTM in a cluster), you must check the Forward SSH agent check box. See ssh(1) for information about security risks of SSH agent forwarding.
Important
It is unsafe to leave the SSH keys loaded in the ssh-agent after finishing your work with Kernun UTM.
The key is deleted automatically on
UNIX, if there was no
ssh-agent running before the Kernun GUI was started.
Otherwise, you need to unload it yourself (e.g. using
ssh-add -d private_key_file).
On MS Windows, the Kernun GUI instances are managed by the GUI launcher, which is set to unload the keys automatically (after a timeout) if there are no main Kernun GUI applications running. You can change this behavior or unload the key manually using the context menu of the Kernun GUI taskbar icon.
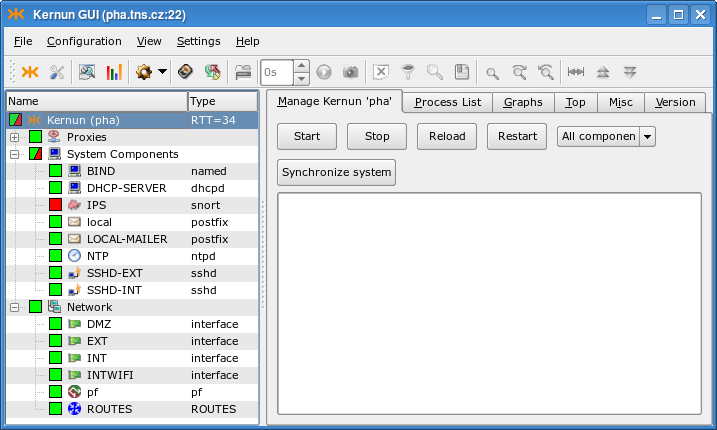
The functionality of the Kernun GUI main window, depicted in Figure 3.3, “GKAT — Kernun UTM management console”, is basically equivalent to the command line administrative tool kat(8). It displays the states of individual Kernun UTM components and allows them to be started, stopped, and monitored.
When connected to Kernun UTM, the state of the proxies and other
system components is indicated
by their state icons. The states of the components are also
propagated to the state icon of their parent component groups and of
the whole Kernun UTM. There are the following component groups:
Proxies, System Components
(such as SSH servers, mail forwarders, or DNS servers),
Network (interfaces, packet filtering, routing),
and Open VPN servers.
A running component is denoted by green icon background ![]() , whereas the background of a stopped component
is red
, whereas the background of a stopped component
is red ![]() . There are several icon overlays that
indicate further information concerning the component's state:
. There are several icon overlays that
indicate further information concerning the component's state:
 Not up-to-date configuration — the
configuration of the component has changed; reload it, so that the changes
can take effect.
Not up-to-date configuration — the
configuration of the component has changed; reload it, so that the changes
can take effect.
 Parent exiting flag — the proxy is in a special state: it
does not accept new connections, but only waits for the already active sessions to finish.
For example, this state may appear when a proxy is reloaded, some sessions
remain open in the old proxy instance, and only the new instance accepts
new connections. Total restart of the proxy stops the old proxy instance and
starts another, so no sessions remain open.
Parent exiting flag — the proxy is in a special state: it
does not accept new connections, but only waits for the already active sessions to finish.
For example, this state may appear when a proxy is reloaded, some sessions
remain open in the old proxy instance, and only the new instance accepts
new connections. Total restart of the proxy stops the old proxy instance and
starts another, so no sessions remain open.
 Not in configuration — the system component
is not in the configuration. Kill the component to solve the problem.
Not in configuration — the system component
is not in the configuration. Kill the component to solve the problem.
 Component's state changing — this overlay
is displayed while the component's state (started/stopped/restarted/reloaded) is being changed.
It disappears immediately after the action is finished.
Component's state changing — this overlay
is displayed while the component's state (started/stopped/restarted/reloaded) is being changed.
It disappears immediately after the action is finished.
In the situation depicted in Figure 3.3, “GKAT — Kernun UTM management console” we know that all proxies are running, even though the Proxies subtree is collapsed. The IPS component is stopped, which is why the System Components and Kernun icons are partially green and red. Kernun UTM has four network interfaces, the packet filter and the routing table running. No Open VPN server is configured. You can click on a component, group, or the whole Kernun UTM icon in the proxy tree to select it and display its details in the right-hand part of the window. The information about the RTT (Round Trip Time) in milliseconds between the GUI and Kernun UTM is displayed next to the Kernun UTM name.
On the Manage page of the whole Kernun UTM (that is, with the top-level Kernun node selected from the component list in the left-hand part of the window), the administrator can easily manage (start/stop/reload/restart) the whole Kernun UTM, as depicted in Figure 3.4, “Kernun UTM Manage Page”.
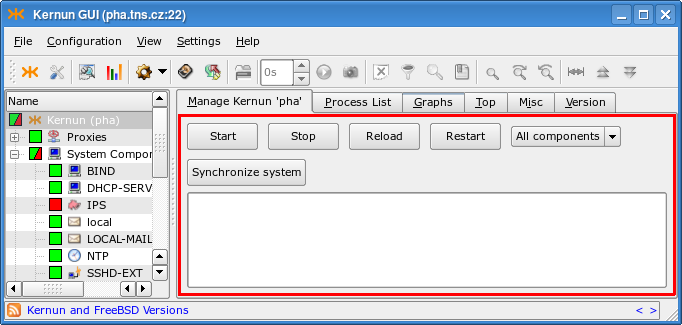
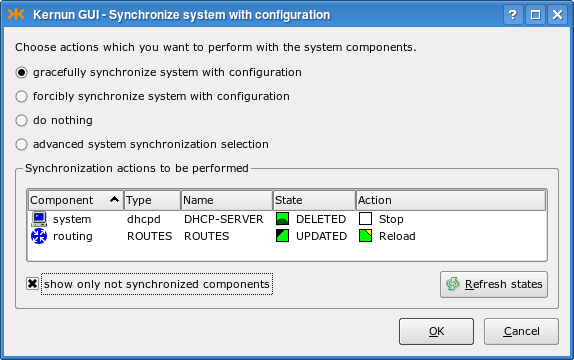
The selected action can be applied either to all components, or to the components marked with a tag in the configuration. The tag or the All components option can be selected from a combo box. A change in the configuration takes effect only after the system state is synchronized with the updated configuration. This can be always done by rebooting, restarting, or reloading the whole Kernun UTM, but it often suffices to restart only a subset of components, while the remaining parts of Kernun UTM may be left running. The Synchronize system button automates this process. It displays a window (depicted in Figure 3.5, “System state synchronization dialog”) that lists the actions required to bring all the components into sync with the configuration. You can manually alter the proposed actions by clicking on a component in the Action column. When you are satisfied, click and all the selected actions will be executed.
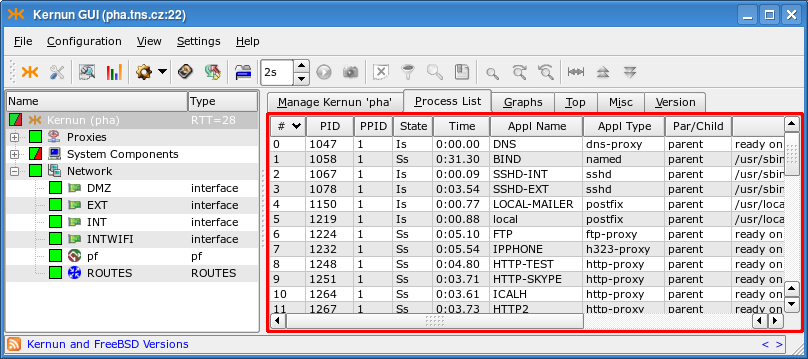
The Process List page (Figure 3.6, “Process List page”) contains the list of the running parent proxy processes[13].
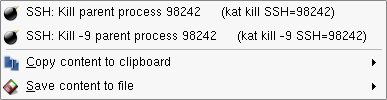
The context menu in the process list
(Figure 3.7, “Process List context menu”) can be used to send the TERM
(Kill parent process) or KILL
(Kill -9 parent process)
signals to the particular process, to copy the contents of
the process list to the clipboard or to save them to a file.
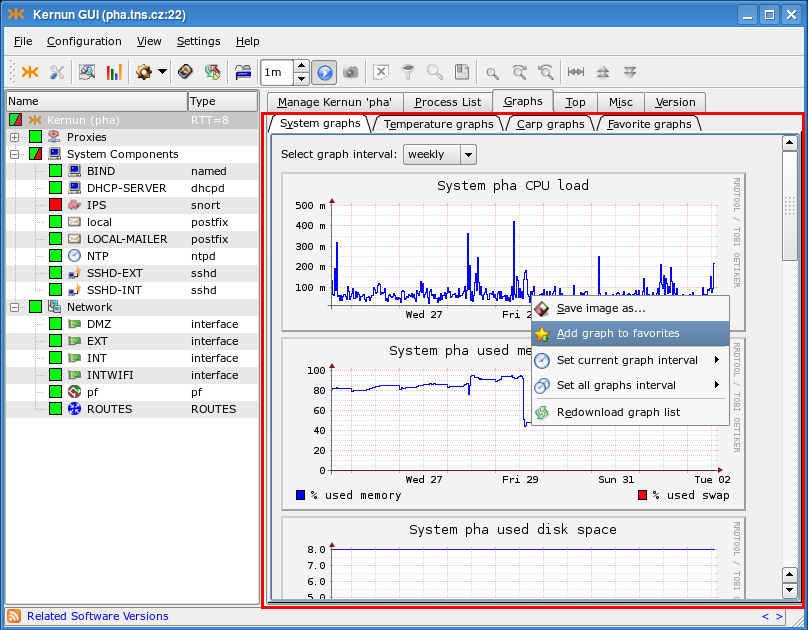
The Graphs page contains graphs of various system parameters, see Figure 3.8, “Graphs page”. There are many monitored parameters of the operating system (CPU load, used memory and disk space, etc.), hardware (temperature measurement, if supported by the hardware), and cluster behavior (switches between the cluster master and backup). Kernun UTM collects parameter values and creates graphs depicting how they evolve in time, with several time scales available. The most detailed graphs show only the recent history, while coarse-grained graphs extend further into the past. Right-click on a graph to open a context menu that makes it possible i.a. to save the graph to a file or to add it to Favorite graphs.
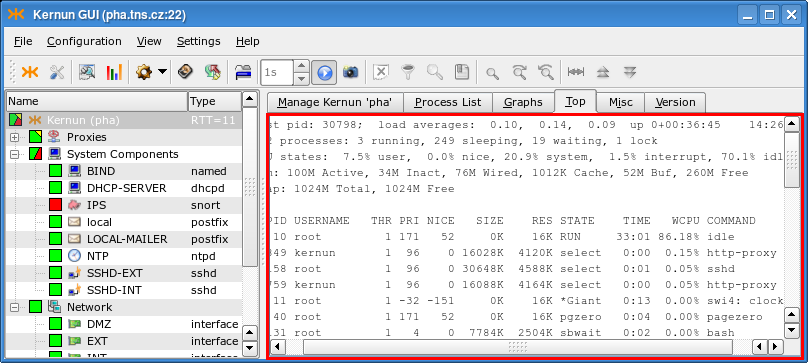
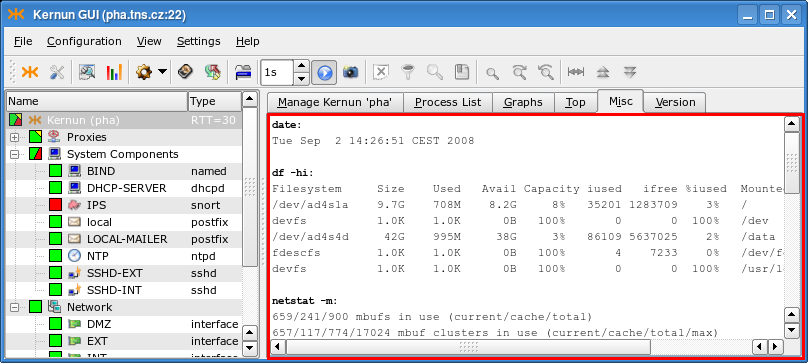
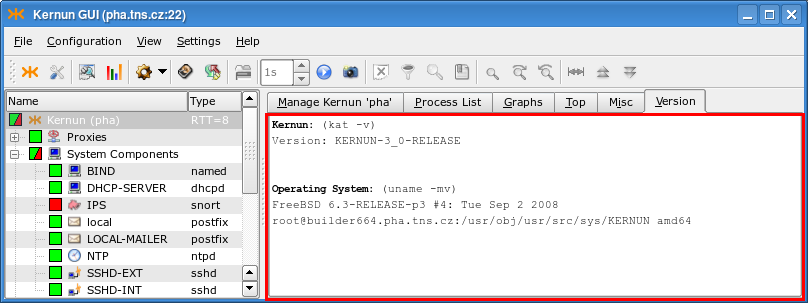
The Top page (Figure 3.9, “Top page”) shows the output of the popular top(1) command. The Misc page (Figure 3.10, “Misc page”) displays the output of several commands, showing i.a. the disk space (the df -hi command), the network state (netstat) or the uptime and current load of Kernun UTM (w | head -n 1). The Version page (Figure 3.11, “Version”) shows the version of Kernun UTM and of the FreeBSD system used by Kernun UTM.
When the Proxies node or a particular proxy is selected in the component tree, it is possible to control and monitor all proxies or the single proxy, respectively. The set of pages is similar in both cases, but the Process List and Graphs pages are available only if a single proxy is selected.
The Manage page for all proxies is similar to the Manage page of the whole Kernun UTM (Figure 3.4, “Kernun UTM Manage Page”), but the button and the combo box used to restrict operations to the tagged components are missing. For individual proxies, there are three additional buttons. terminates the proxy like , but works also for proxies that are removed from the configuration. The and buttons change the log level. For more information about log levels, see logging(7).
The Process List page contains the list of running processes, restricted to the processes that belong to the particular proxy; both parent and child processes are listed. The functionality is identical to the global process list (Figure 3.6, “Process List page”), including the possibility to send signals to processes.
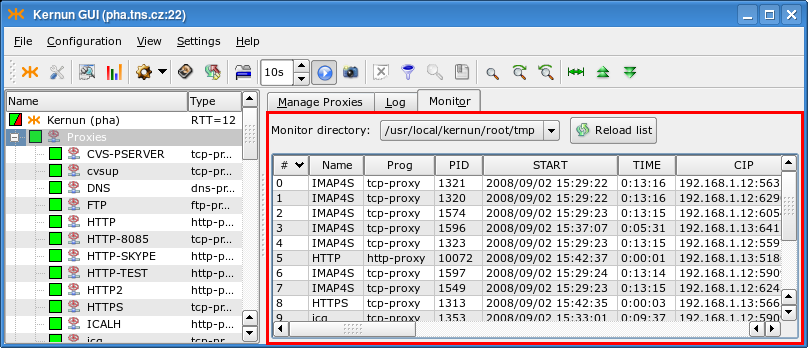
The Monitor page, see Figure 3.12, “Proxy Monitor”, shows the current active sessions of all proxies, or of the selected proxy. Its content is available only for proxies, for which monitoring(5) is enabled in the configuration. Proxies can be configured to generate the monitoring information into different directories, so it is possible to select the directory, from which the GUI will read the monitoring data.
The Graphs page's functionality is similar to the system-level one shown in Figure 3.8, “Graphs page”, but different graphs are displayed: the number of proxy child processes and the number of bytes transferred by the proxy.
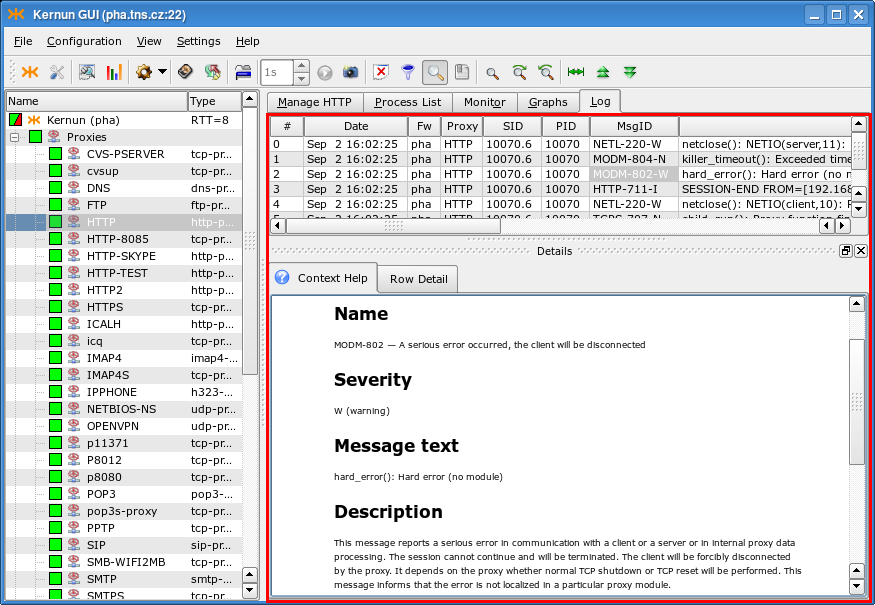
The Log page shows the current log messages of the selected proxy, or of all proxies. New messages are added immediately, so the log view provides information about the current proxy activity. Select from the context menu in the log view to open the Details window with a reference page containing information about the selected message. Click on the Row Detail tab in the Details window to display the message as a whole, rather than split into fields. Figure 3.13, “Proxy Log” shows the log page with the Details window displayed.
The Network node in the component tree groups individual network interfaces, the routing table, and the packet filter[14].
All nodes in the Network subtree share the Manage page containing buttons for starting/stopping/restarting/reloading a component, similar to that of the whole Kernun UTM, as depicted in Figure 3.4, “Kernun UTM Manage Page”, but without the Synchronize system button and the component tag selection combo box. Other pages differ for various types of nodes in the Network component subtree. For the Network node, individual network interface nodes, and routing there are pages containing output of the ifconfig(8) and netstat(8) commands with various parameters. The Network node provides an additional page sockstat -4 with the list of all existing IPv4 sockets. Each network interface has a Graphs page with traffic statistics graphs in bits and packets per second. Otherwise, the page behaves like its system-level counterpart (Figure 3.8, “Graphs page”). The current configuration and state table of the packet filter node can be displayed using pages containing the output of the pfctl(8) command.
The toolbar and the menu of the main GKAT window contain almost identical sets of actions. They are adapting to the currently displayed components (page) of the application, i.e., only the useful (and usable) buttons or menu items are enabled.
Figure 3.14. Main window toolbar buttons, listed together with the corresponding menu items, and sometimes keyboard shortcuts:

— Shows the about dialog box with information about the GUI version.
— Opens the basic preferences dialog, in which you can set the default behavior of your GUI (e.g., your default diff program).
<Ctrl+L> — Opens a form, in which you can choose certain restrictions of the log information to be analyzed (date, time, proxy, etc.), and then downloads the log from Kernun UTM and displays it in a new window (for more information on log analyzing see Section 1.3, “Logs”).
— Opens a proxy statistics browser window. If configured, daily, weekly and monthly statistics of traffic handled by proxies are computed from the log. The browser window displays a hierarchy of available statistics ordered first by the frequency (weekly/monthly/daily), then chronologically, and finally by the proxy name. After choosing an item from the hierarchy, the corresponding statistical output (in the form of a HTML document with images containing graphs) is displayed.
The submenu:
— Downloads the Kernun UTM configuration and opens a window, in which you can edit it (see Section 1.4, “GCML — Configuration”).
— Lets you choose and edit a sample Kernun UTM configuration that you can later use as your Kernun UTM configuration.
— Opens a local configuration file for editing. You can later upload it to your Kernun UTM to use it as its configuration or save it back to your computer.
— Opens an RCS Browser displaying all the changes you have made in the Kernun UTM configuration and making it possible to switch back to any of the previous versions.
The submenu:
— Opens the console with an ssh connection to Kernun UTM.
— Opens a dialog, in which you can create custom remote commands that can be executed in the console. When created, they are added to the menu and can be easily invoked.
— Provides routines to install, backup, and upgrade Kernun UTM installations. See Section 5, “Installation”, Section 6, “Backup and Restoring”, and Section 7, “Upgrade” for details. The system manager has also the License page, accessible also from . It displays the current license file and provides a button for uploading a license file to Kernun UTM.
— Restarts the connection from the GUI to Kernun UTM. It may be useful if your RTT gets too high or the connection is interrupted.
<Ctrl+T> — Opens the current page in a new window and keeps it up-to-date (refreshes the selected page).
Refresh Frequency — The period, with which new data is downloaded from Kernun UTM. The lower is the period, the more traffic load Kernun UTM produces towards the GUI.
Start/Stop — Starts and stops refreshing (downloading of new information from Kernun UTM) of the current page.
— Makes a static copy of the current page and opens it in a new window. This window is never refreshed. It can be used to analyze the snapshotted situation (e.g., the traffic log).
— Clears the contents of the current page.
<Ctrl+M> — Shows or hides the Filters and Markers window, which is used to specify filtering and marking for the displayed log (see Section 1.3, “Logs”).
<Ctrl+D> — Shows or hides the details window, which displays the details of the current row (e.g., in a log) and the reference page for the current row type.
<Ctrl+B> — Shows or hides the bookmarks window. Bookmarks are used to assign a name to a certain line of a snapshotted situation. You can then easily jump from one bookmarked line to another.
<Ctrl+F> — Opens a dialog used to search for selected text in a selected column. The view highlights all the found occurrences and jumps to the first one.
<Ctrl+G> — Jumps to the next line marked by the chosen marker.
<Ctrl+Shift+G> — Jumps to the previous line marked by the chosen marker.
<Ctrl+I> — Adjusts the column widths according to the widths of their contents.
<Ctrl+Up> — Scrolls to the beginning of the current page.
<Ctrl+Down> — Scrolls to the end of the current page and keeps scrolling so that the newly added lines are displayed. This function is most useful with the Log page, if we want to display newly added messages continuously.
The Kernun GUI contains a powerful log analyzer. It provides tools for filtering out undesired log entries and for marking those that are more important to you with different colors. The log window (possibly displayed as a part of another window) is displayed in several modes: you can either open a local log file, download a “historical” log file from Kernun UTM, take a snapshot of the currently displayed log, or work with the up-to-date (and changing) log.
The first setting concerning logs is the specification of the log level for the particular proxy (permanently in the configuration or temporarily using buttons on the Manage page). There are seven different log levels, as described in logging(7). The higher the level is, the more information the Kernun UTM stores (and sends to your log analysis window).
Figure 3.15, “Example of a simple HTTP filter and marker set” shows an example of a log display window (created by selecting in the GKAT main menu). The logs are presented as tabular data. You can drag a column by its title and drop it elsewhere to change the column order. Each column has a context menu used to select which columns are to be displayed. For example, if you are analyzing a log from a particular proxy in a single Kernun UTM network, you may want not to display the columns Fw (Kernun UTM name), Proxy and PID (as the PID is also included in the column called SID, which is a concatenation of the PID and the number of the current session[15] served by this process). You can use the Save column visibility settings option, so that you do not have to set it every time.
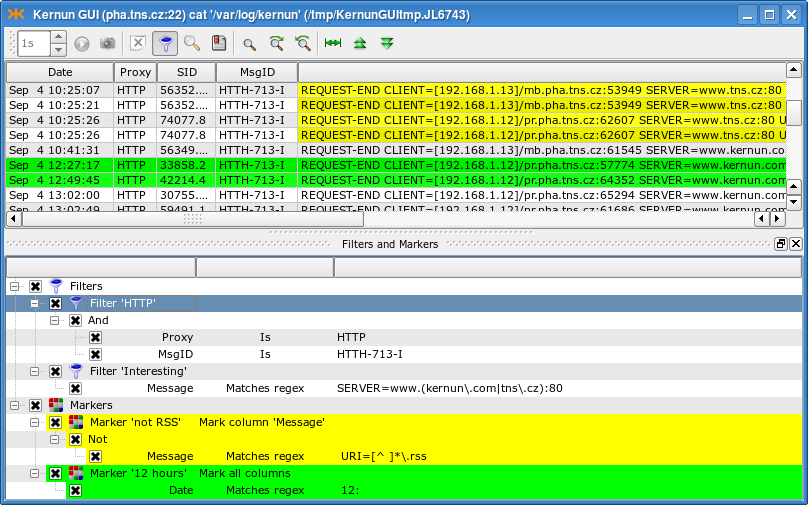
The filters and markers are accessible using (<Cltr+M>). Filters are used to display only the log entries that you are interested in, while the main point of markers is to highlight some special rows (columns) in the log. A selected marker can be then easily used to jump to the next/previous marked line.
Note
Both filters and markers are managed (created, deleted, moved, changed) in a similar way. From now on we will only describe management of filters. However, all of the operations work in the marker context, too.
The only difference between the management of filters and markers is that markers are applied automatically after a change, whereas filters need to be explicitly applied by selecting the option from the context menu of the Filters node, or by clicking on the same button, which appears blinking after any change in the filter set. Moreover, the context menu of a marker contains an option used to change the highlighting color and highlighted column(s).
Important
If you work with the current live log, the filters only apply to the newly incoming log messages. The old ones are not filtered out even if you apply the filter. To filter out older log entries, tear off a snapshot. Markers take effect instantly in all situations.
There can be many filters in the system. They are all presented in the filter tree under the Filters node. Some of the filters may be turned off (by unchecking the box next to their name). Each filter is a tree of conditions with logical operators And, Or and Not. Each condition consists of a column to be examined, a relational operator and a desired value. The relational operator defines the relation between the value in the column and the desired value that must be fulfilled in order for the row to be included in the log. The following relational operators are available: Is, Contains, Matches regex and their negations, Starts with and Ends with; they are all self-explanatory.
The easiest way to create a filter is to drag and drop a field from the log table. A new filter is created and a new condition inside this filter is initialized with the value of the field you dropped there. You can also drag a field and drop it on the relational operator (then the new condition is added as a child of the operator) or on another condition (in this case, you are asked whether you want to use And or Or to connect it with the target condition or whether you want to add the new condition to the same parent). Other useful options (including creation of a new filter) are listed in the context menu of the selected node of the filter tree.
Having created some filters, you can copy a particular node (and all its subnodes) to another place simply by dragging it there. In this way you can easily create a filter from an existing marker, and vice versa.
You may want to save filters you create for future use. You can save a single filter or any subset of filters. Both saving and loading of filters is done using the context menu of the chosen filter (or the Filters node). A filter can be saved either to a local file, or to the registry. The filters (and markers, of course) in the registry are displayed in (and can be loaded from) the submenu of the top-level Filters/Markers context menu.
Tip
To rename a filter/marker, double-click on its name or select from the context menu.
This section describes the GUI functionality for examination and modification of the Kernun UTM configuration. It does not describe the configuration language. See Section 1, “Configuration Language” for an introduction to the configuration syntax and semantics, and Section 2, “The Initial Configuration” for a simple configuration example.
Kernun GUI provides a GUI editor for the Kernun UTM configuration
files (kernun.cml
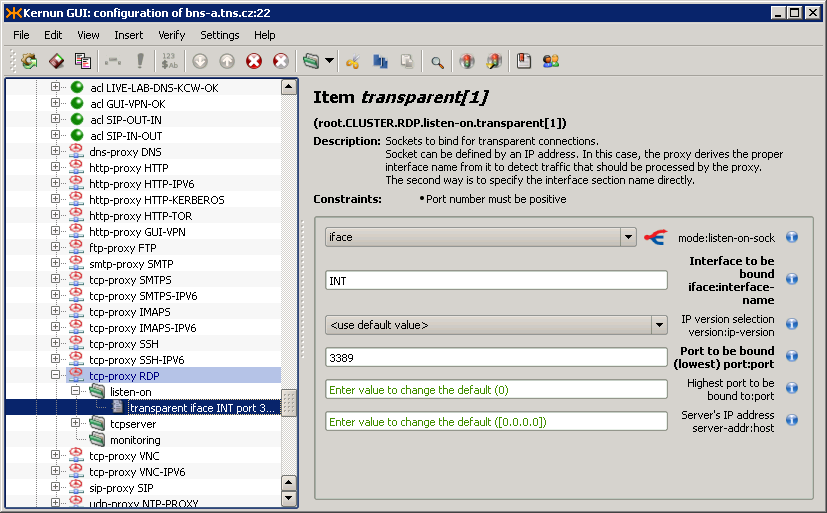
Figure 3.16, “GUI CML Editor” shows the main GUI configuration window. The configuration is displayed in an expandable configuration tree. You can select a node to display and easily edit its details in the right-hand part of the window. The displayed details include the selected node's type and name, its full path in the configuration (as displayed by cml(8) in the command line prompt), a brief description, and the constraints (if there are any). There is also a form with fields (editable, if appropriate) that represent the elements of the selected node. A short description, the name of the element, and the expected data type are displayed to the right of each field. The labels of the required fields are highlighted (bold). Several field types help you fill in data of the correct data type. If you make a mistake (e.g., do not fill in all the required information or do not respect the expected data type) the background of the incorrect field is highlighted, an exclamation mark button appears next to it (click on the button to show the error message) and the error is also displayed in the configuration tree.
When editing the configuration, select in the main menu to display the differences between the current contents of the configuration and the original configuration file downloaded from Kernun UTM. The currently edited configuration can be saved to a local file using the menu item. In addition to online marking of incorrect configuration nodes, it is possible to invoke verification of the whole configuration using .
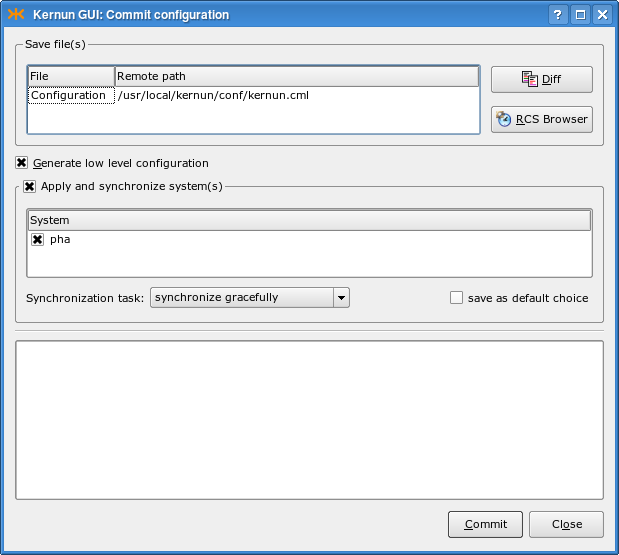
When you finish editing of the configuration, you may want to save and apply it to Kernun UTM or save it as a local file. Both can be easily done using the menu. Committing of the configuration (<Ctrl+S>) invokes a dialog, depicted in Figure 3.17, “Configuration commit dialog”, where you can choose actions to be done with the configuration on Kernun UTM (save/generate/apply/synchronize state, all done by default) and the configuration to apply. The results of the action are displayed in a text box. If you have made any changes to the configuration, you are asked to fill in the RCS Log Message describing the changes. First, the configuration file is saved and stored in a RCS file, in which the complete history of changes is kept and from which any old version of the configuration file can be retrieved. Then, low-level system and proxy configuration files are generated. The application of the configuration means copying the low-level configuration files to locations, in which Kernun UTM components look for them at the startup. Finally, the system state is synchronized with the configuration. This is the same action as the one performed by , including the possibility of reviewing and modifying the list of performed actions in the dialog window shown in Figure 3.5, “System state synchronization dialog”.
Each line of the configuration tree represents a node of the Kernun UTM configuration and has an icon according to its type. You can select a node by clicking on its name. The easiest way to move in the tree is using the cursor keys. <Up>/<Down> selects the next/previous node, <Right> expands the current section, <Left> jumps to the parent of the current node (or collapses an expanded section). A non-empty section node can also be expanded/collapsed by clicking on the +/- sign next to it. Useful commands for interaction with the configuration tree are available in the menu, the context menu of the selected node, and on the toolbar. A section can be expanded, along with all of its subsections (and their subsections, etc.) by selecting <Ctrl++> (and collapsed using the <Ctrl+-> command). Because the order of individual sections and items matters, you can move a node up and down (<Ctrl+Up>/<Ctrl+Down>) using commands from the same menu. You can also (<Ctrl+D>), (<Ctrl+H>), (<Ctrl+C>), (<Ctrl+X>) or (<Ctrl+V>, pastes the last copied/cut node under the selected one) a node.
Tip
If you are more familiar with the line-oriented cml(8) tool, you may want to see the text version of the configuration of the current node (section). This is accessible from the menu or from the context menu of the node. A read-only window containing the output of the /show -a cml command is displayed.
Inserting a new node using the
menu is relatively easy with the GUI.
First, you need to decide where you want to add the new node
(as the first child, as the last child (<Ins>), or next
to the current node (<Ctrl+I>)). Then you need to
choose the type of the new node (section, item, data variable
definition, section variable definition, section variable application,
for loop, switch/case, include file, or comment).
In the case of inserting a section, item or section variable, you need to
choose the type of the section/item and its name (if appropriate).
Finally, the new node is inserted and you can edit its properties in
the details window.
Several form field types are used to represent the properties of a node. It is important to understand each of them, in order to fill in correct data.
Text box — Expects text data. However, you cannot fill in anything; you still need to preserve the data type specified in the parentheses in the field label (e.g., the sock type means
[). The syntax of values of various data types used in the Kernun UTM configuration is described in Section 1, “Configuration Language”.ip]:portCheck box — Can either be checked (true), or unchecked (false).
Combo box (selection) — You can choose exactly one of the specified options. If you want to enter its content manually, you need to use the menu item, which allows you to write there “anything” (e.g., a variable name). If there is a “fork” icon next to the combo box, the value of the combo box decides which further form fields are displayed (e.g., in
system.smtp-proxy.delivery-acl.senderthe error value requires further constraints on the error, whereas the ok option does not).List of values — Some CML properties (e.g.
system.acl.service) expect a list of values of a certain type (str, addr…). You need to be able to create new values, as well as change and delete the old ones. The value list field type displays each value of the list in a separate row. You can simply edit a particular value in the same way as you are used to work with the above-mentioned field types. A value can be deleted from the list using the icon next to it. To insert a new value, click the button. The value lists can be multidimensional (any value list can contain sublists, which can also contain sublists, etc.). You can append a new sublist by clicking the button. On the right from a sublist there is a button with a submenu that allows to or (creates the negation of the current sublist). List items can also be loaded from a file, in which each line represents one item of the list. To “inject” a file into a list, click on the button and select theshared-filesection name, in which the file name and the format (e.g., IP addresses, text or REGEXPs) are specified.
Tip
The contents of the shared-file can be
edited in the GUI in the details of the path item of
the shared-file section.
As orientation in a very big configuration may become difficult, the Kernun GUI provides tools to simplify it.
First of all, you can use (<Ctrl+B>) to create bookmarks (like in your Web browser) to important positions in the configuration tree. The bookmark window is displayed in the top right part of Figure 3.18, “Bookmarks and relevant sections in GUI CML”. To add a bookmark to the current configuration node, select the option from its context menu or the option from the context menu of the bookmark list in the Bookmarks window. You are asked to fill in the bookmark's title before adding it. You can jump to a bookmarked node by double-clicking the bookmark's name in the Bookmarks window. Additional bookmark operations (removing, renaming) are available from the context menu of individual bookmarks.

In addition to simple bookmarks, the Kernun GUI provides smart bookmarks, accessible via (<Ctrl+R>). Smart bookmarks are used to highlight the configuration nodes that are relevant to the chosen nodes (e.g., the ACLs for proxies) and to easily jump to them. The function of finding and highlighting of the relevant nodes is only available for proxies (it would not make much sense for other nodes), but the relevant nodes may include any sections (proxies, ACLs or other sections). A node is relevant to a proxy if a change to the node may alter the behavior of the proxy.
There are two lists of bookmarks in the Relevants window. The first one (Proxies) displays the list of all proxies in the configuration and makes it possible to select the proxies, for which the relevant nodes are to be highlighted. The other list (Relevant sections) displays bookmarks to configuration nodes that are relevant to the chosen proxies. Again, you can double-click a bookmark to jump to it in the configuration tree. After selecting the proxies in the Proxies list, the relevant nodes are highlighted in the configuration tree and bookmarks to them are displayed in the relevant sections list.
There are more actions available from the context menus of the items of the bookmarks lists, including (which adds the current item to the simple bookmarks), (works like double-clicking on the item), and several default selection templates for the proxies. Furthermore, you can choose the types of relevant nodes that you are interested in for the Relevant section items.
Tip
You might not want the relevant item list to be to refreshed automatically (after every change in the configuration and in the selection of the proxies), especially on a slower machine. This behavior can be controlled from the context menu of any of the relevant items using the check box in its context menu. If it is unchecked, you have to refresh the list manually by clicking the button.
The Kernun GUI provides configuration wizards in order to simplify the configuration of complex tools (OpenVPN, IPSec). All the wizards are accessible via the menu item. Select to open a dialog that describes all the wizards and the use of the created part of the configuration, and makes it possible to start the selected wizard.
Each wizard is divided into several pages that prompt the user to fill in individual fields. The form fields are the same as in the GCML, so you can use references to other parts of configuration or data variables. The fields highlighted with orange background are filled incorrectly and you need to correct their values before you are allowed to proceed. The last page of each wizard displays the part of the configuration that has been created using the wizard and the result of verification of the configuration after the changes are committed into the configuration. If you do not like the values, you can return back in the wizard, correct the respective fields and proceed to the wizard overview again. When you finish the wizard, the created configuration is committed to the main system configuration. You can cancel the wizard at any moment to undo all the changes and return back to the GCML.
The Help button located on each wizard page opens a help window next to the current page that describes all the fields on it. The contents of the help window always correspond to the current page.
Tip
All that can be created using wizards can be done also manually using the standard GCML interface. Another option is to create only the core part of the configuration using the wizard and then modify it using the GCML.
There are currently five wizards in the Kernun GUI. They are described in more detail in the corresponding sections of the handbook.
Section 3.1.1, “TCP Proxy to Server in External Network” — enables connection from clients in the internal network to server(s) in the external network (e.g., access to HTTPS servers).
Section 3.1.2, “TCP Proxy to Server in Internal Network” — enables access of external clients to servers in the local network (e.g., a proxy for local IMAP4S mail servers allowing employees to download their mail from home).
OpenVPN Remote Access Server — configures an OpenVPN server that will accept connections from clients in the external network (road warriors).
OpenVPN Network to Network — configures a local OpenVPN peer, which will connect local and remote networks (behind another OpenVPN peer).
IPSec — configures IPSec in the tunnel or transport mode to secure the communication between the specified local and remote networks.
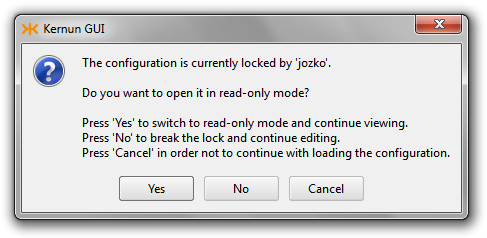
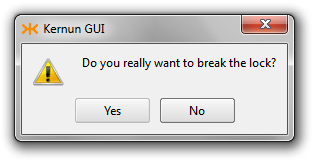
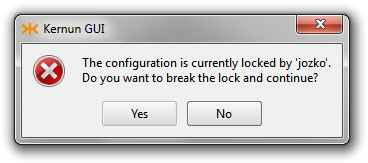
The Kernun GUI implements a configuration locking mechanism, which prevents changes made by different users from being accidentally overwritten. The first user to open the CML configuration in edit mode or the System Manager acquires the configuration lock. Any other user trying to open the configuration at the same time will not be able to acquire the lock. Hence, the user will be presented with the Figure 3.19, “Configuration already locked by other user” dialog presenting the available options. The choice to break the lock must be confirmed explicitly in Figure 3.20, “Break lock confirmation” as a potentially dangerous operation.
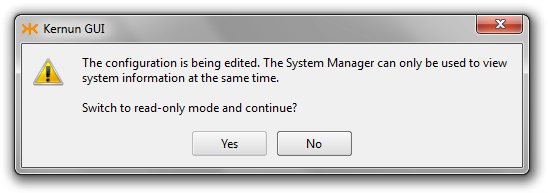
The Kernun GUI also prevents the user from modifying the configuration in two different places at once. Therefore opening the System Manager while editing the configuration results in Figure 3.21, “Configuration and System Manager at the same time”.
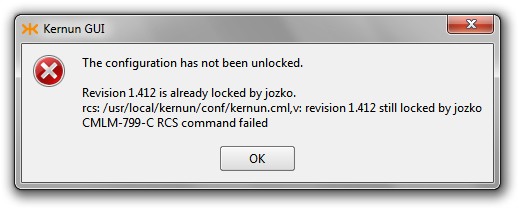
The Kernun GUI unlocks the configuration automatically when the user closes the window, which has acquired the lock. Possible errors are reported (Figure 3.22, “Configuration unlock failed”).
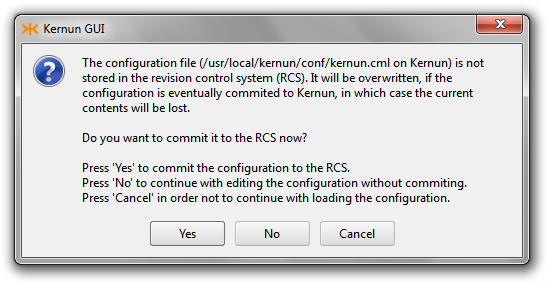
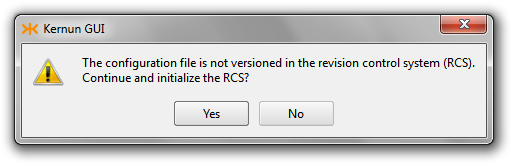
After the locking phase, the CML configuration editor checks whether the actual contents of the configuration file have been stored in the revision control system (RCS). If not, the user will be asked whether to do so (Figure 3.23, “Commit configuration to RCS confirmation”). The configuration file or the RCS version file may not even be initialized (Figure 3.24, “Initialize RCS confirmation”).
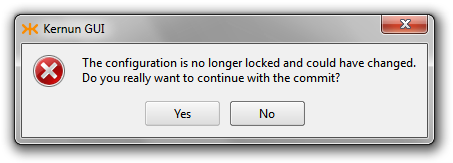
Before commiting the configuration to Kernun, the CML configuration editor checks whether it still owns the lock. If not, it may have either been broken and still locked (Figure 3.25, “Configuration lock broken”) or broken and then unlocked (Figure 3.26, “Configuration not longer locked”).
[12] The binary executables are compiled for the version of FreeBSD used by Kernun UTM.
[13] Usually, there are many simultaneous requests on each Kernun UTM proxy, which need to be handled simultaneously. To do that, for every proxy there is one parent process, which only manages its child processes (starts and kills them), while these child processes take care of the traffic. Therefore, the number of the child processes depends on the current traffic.
[14] Kernun UTM uses the PF packet filter (see
pfctl(8) and
pf.conf(5)), which provides
stateless and stateful packet filtration, NAT, and traffic
shaping.
[15] A session encompasses the communication of a particular proxy process with a single client.